|
Fretwork
and marquetry, D. Denning |
Attention: Some browsers fail to show this page correctly.
Internet Explorer does it fine.
|
|
|
|
|
|
|
|
|
|
|
CHAPTER IX.
Cutting Angles and Various Outlines.
ALTHOUGH various kinds of lines have been
described for initiatory practice,
there are many hints or wrinkles in connection with actually working
to a design which are useful.
On looking at any ordinary fretwork
pattern certain forms of constant recurrence will be noted. More or less
modified, we find
|
|
|
|
|
|
|
|
|
them in all designs. Thus we have sharp
acute points, both on the waste and on the part forming the pattern. The
former may be called angles, and the
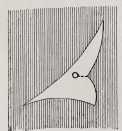
latter points, for purposes of explanation. As an example, fig. 38
with three angles and one simple point
may be taken. This and others merely show the outline of the waste to
be cut away, or the outline of one
part of the pattern, as the intention is not so much to give a design
for fretworking as to give typical examples which will assist in cutting any
pattern. Taking the figure as it
stands, bore the hole as indicated by the dot near
|
|
|
|
Fig.
38. Cutting Acute Points.
|
|
|
|
|
|
|
|
the point, in order that the saw shall
commence on the line at this. Sawing would then be continued till a corner
is reached. The cutting action of the saw must be arrested and the wood
turned round on it till the new direction of the line is reached, when the
cutting can be resumed. The next corner is much sharper
|
|
|
|
|
|
|
|
|
|
|
|
|
|
|
|
|
|
|
|
|
CUTTING ANGLES AND VARIOUS OUTLINES.
67
and presents more difficulty, but it is
to be managed in the same way, the only difference being that the saw may be
drawn back a trifle more than before, so that the waste wood only is cut
into. Were the saw to be turned right in the corner, instead of getting this
nice and sharp, the blade will probably cut into the wood of the design and
form a small round curve instead.
Proceeding to the next alteration in the
direction of the line, viz., the corner at top of the illustration, the
angle is very much more acute, the waste wood going off into a thin feather
edge. To manage this neatly and cleanly so that the sweep of the line next
to be cut on may be preserved will tax the skill of the fret-cutter, as it
is by no means easy of accomplishment unless he just makes a bold dash at it
by widening the point. This might be done without any serious disfigurement,
but it would only be evading a difficulty. To cut such a corner, instead of
turning the saw in it directly, work back, that is, let the saw come back a
little in the kerf just cut, then turn in the waste wood and bring the back
of the saw into the angle. Its teeth are now in the direction to be cut, and
it is only necessary to saw on to the point at which the start was made. The
saw should be worked slowly, and if properly done the angle will be no wider
than the thickness of the saw-blade. Another way in which a sharp angle like
this can be cut: After having sawn up to it, bring the blade back through
the kerf till it is at a convenient part to turn and
saw across to the point. From this make a fresh start and saw to the
corner which has still to be completed. Very gentle action will be necessary
as the blade approaches the corner of the waste wood, for the point of the
waste wood being very thin is almost sure to break away and cause a
difficulty in making the corner sharp. In this case the waste wood is cut
into two portions, and it will be better to remove the first of them as soon
as practicable instead of waiting till both are cut. The saw might have been
brought on to the line of the design at the corner first referred to instead
of at the point, but neither of the other two corners, from their acuteness,
would have been so suitable.
Although we have explained how a very
sharp corner may be cut, unless extreme accuracy is wanted such care need
not be taken in ordinary articles of fretwork.
Taking points next, the ways in which
they may be cut have now to be described. They are the opposites of the
corners, so that what are the corresponding parts in the waste wood are
reversed. With corners the preservation of the points in the
E 2
|
|
|
|
|
|
|
|
|
|
|
|
|
|
|
|
|
|
|
|
|
68
FRETWORK AND MARQUETRY.
waste was of no consequence, with points
as part of the design the preservation of the corners of the waste is
unnecessary. On the whole, points are more easily cut than corners, the
chief
|
|
|
|
|
|
|
|
|
difficulty in connection with them being
to keep them unbroken when they are
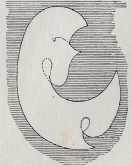
long and thin. To serve as an illustration fig. 39 is given. In it
are two fairly sharp points, and one more obtuse.
This latter, of course, presents no difficulty, but the others
require some nicety in manipulation.
As before, the hole may be drilled in any part of the waste, and we
will assume a. start is to be made at the blunt
point. The saw meets the design at it, and follows the line to the
large sharp one. The saw may be simply
turned in the waste wood on reaching it, and it. is by no means
impossible, or even difficult, to do so if a short distance,
|
|
|
|
Fig.
39. Cutting Out Points.
|
|
|
|
|
|
|
|
say the width of the saw, is cut
beyond it. It may be easier, and in
many instances advisable, instead of turning
directly, to continue sawing in the waste, turning the wood, so
that the saw never really turns but cuts its way again to the point,
where it continues on the line of the design. The dotted lines
show the course of the saw at the point clearly. The next
point, introduced specially for a reason shortly to be explained, is
turned in the same way, and the cutting continued till the waste
piece is dissevered. It may be wondered why the blunt point is
selected as the one from which the start should be made. The start
might have been made from any of the others ; but suppose we had
done so at the thin sharp one, and sawn first along its upper or
rounded outline. All would very likely have gone on smoothly
enough till sawing round to its point again. From its shape it is
very fragile, and having been severed from the wood on its upper
side there is nothing to support it there. Assuming that the grain
of the wood is across this point or tongue, the chances are that the
least roughness, or any but the most tender sawing, would cause;
it to snap off before the point is
reached.
|
|
|
|
|
|
|
|
|
|
|
|
|
|
|
|
|
|
|
|
|
|
CUTTING ANGLES AND VARIOUS OUTLINES.
69
If from any reason, such as might arise from any contiguous parts of the design, rendering it advisable to start from this
|
|
|
|
|
|
|
|
particular sharp point, the best way would be to saw along its upper side to the corner, draw back the saw,
and start afresh from the
|
|
|
|
|
|
|
|
|
|
|
|
|
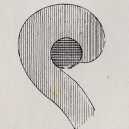
Fig. 40. Cutting Out Points FRom Centre.
|
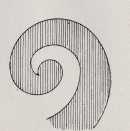
Fig. 41. Cutting Out Long Points.
|
|
|
|
|
|
|
|
point, but this time in the opposite direction, so that the waste piece would be cut out by the time the saw had got round to the corner alluded to. In some cases it may be advisable to start each cut from the centre, so as to avoid any turning of the saw. As in a piece like fig. 40, it would be preferable to do so. In this instance the waste will come away in several pieces.
As a variety from this latter method of cutting a figure, which, for purposes of explanation, is intentionally an exaggerated form, one much more likely to happen is shown in fig. 41. In this instance it might be desirable, and in the majority of cases the easiest method would be, to saw round the main curve of the outline and then from point to point, as indicated by the dotted line, the piece of waste between the points being removed by separate saw cuts in the direction of the corner from the
|
|
|
|
|
|
|
|
|
|
|
|
|
|
|
|
|
|
|
|
|
|
70
FRETWORK AND MARQUETRY.
points themselves. By this means the points are cut sharply without much risk of injuring them, and the corner is equally sharp and clean.
Patterns containing curves, as that in fig. 42, are by no means uncommon, and it is better to cut out the round piece in the upper portion of the waste by boring it instead of cutting it away with the saw. The drill, or whatever is used to make the hole with, must be of suitable size, and if so the curve will be more
|
|
|
|
|
|
|
|
|
|
|
|
|
|
|
|
|
Fig. 42. Cutting Out Curves.
|
|
|
|
|
|
|
|
|
regular than if sawn. The part to be bored out is shown black in the illustration. The drill, or suitably-sized boring tools, can often be used with advantage in similar situations.
Scrolls such as that shown in fig. 43 are often met with, and perhaps they are the most troublesome of all to cut successfully, not so much because of any difficulty in sawing the outline as in the liability of breakage from the grain of the wood being across it at some portion or other. Along one edge may be sawn without risk, but when the other is being cut great care is necessary.
In addition to these special examples, and in order that the suggestions offered may be taken full advantage of, it is necessary often that the design should be carefully studied to note what method of cutting would be the best not only for ease but to avoid, as much as possible, risk of breakage and injury. Thus it sometimes happens that there is a long thin piece with waste to be removed from each side of it. With thick strong wood there is not much danger, but with fragile stuff and a comparatively coarse saw
|
|
|
|
|
|
|
|
|
|
|
|
|
|
|
|
|
|
|
|
|
|
CUTTING ANGLES AND VARIOUS OUTLINES.
71
discretion may often prevent disaster. As a rule, it is always advisable to support weak parts of the design, and to cut them while some of the waste strengthens them. Thus in fig. 44 we
|
|
|
|
|
|
|
|
|
have a weak stem. Were the square or straight lines to be cut first, when cutting the second outline of the stem there would be little support to it. The best way — after one of the waste pieces has been cut out—is undoubtedly to saw down the remaining outline of the stem, and then proceed to
the straight cuts.
It may be asked whether such examples as those given are met with in every fretwork design, or if every one of these is made up entirely of such or similar points, corners, etc. The answer must be in the negative. The illustrations given are merely specimens of what is likely to be met with, and the hints are for the purpose of enabling the
|
|
|
|
Fig. 44. Cutting Weak Stem.
|
|
|
|
|
|
|
|
sawyer while he is new at the work to avoid mishap. When he has made some progress he will be able to discern ways and methods most appropriate for the design he is working on. Each one requires different treatment, and probably among experts no two would be found to proceed exactly in the same manner. Some might want to turn out the work in the shortest time regardless of its finish, while others might prefer to spend more time in order to have the cutting as nearly perfect as possible, and not merely good enough to pass muster. The amateur who is not working for purposes of sale should aim
at perfection in his work, and not grudge care nor time.
|
|
|
|
|
|
|
|
|
|
|
|
|
|
|
|
|
|
|
|
|
CHAPTER X.
Designs for Fretwork, and How to Use Them.
WERE designs not available for the fretcutter, all that has gone before would not be of much use to help him forward in the art,
for it is by no means likely that many could or would be at the trouble of making their own drawings. Fortunately the modern fretcutter is largely catered for and he can pick and choose from many thousands of designs. The fretsawyer of the present day has a distinct advantage over his predecessors, for it is not so very long ago that designs for fretcutting were almost entirely confined to small pieces for ornamenting articles of furniture. The extent to which the great English cabinet-maker of the last century, Chippendale, relied on fretwork for the decoration of his furniture is no doubt well known to most readers, and the hint that they may ornament furniture which would otherwise be plain easily and artistically by means of the fretsaw will probably be useful to many.
It is, however, not so much our object at present to show how articles of solid furniture may be decorated by means of fretwork, as to show how things may be made up entirely of fretsaw work, and it will be an advantage to know something about the designs obtainable.
The beginner should get catalogues of designs from the various publishers. From these he will obtain a far better idea of the number and variety of the articles which can be made up than by any other means. He will also find the catalogues of great use for reference and for the selection of patterns, as most of them contain miniature illustrations from which a very fair idea of the articles described may be gathered.
Among English publishers may be mentioned Harger Bros, and
|
|
|
|
|
|
|
|
|
|
|
|
|
|
|
|
|
|
|
|
|
|
|
DESIGNS FOE FRETWORK, ETC.
|
|
|
|
|
|
|
|
|
Skinner and Co. H. Lilles and Co. have an important collection of German origin. Italian and Belgian designs are supplied in this country by Busschotts. American designs are obtainable from many dealers. There are also many continental publishers whose productions, however, are not easily obtainable in this country.
A glimpse at the chief characteristics of the different designs produced in the different countries, or the principal of them, may not be uninteresting and certainly will not be useless to the
novice.
English designs, as a rule, do not appeal to our fancy so much as many others, but this is to some extent a matter of personal taste. Without saying that many of them are not excellent in conception, especially the later productions of the leading publishers, we cannot discern in the vast majority of them the same artistic merit as in the chief continental design. Comparatively few of them afford satisfaction to those who have made a study of design. The chief English designs are printed in solid colour, i.e., the wood which will constitute the pattern when cut is represented by ink in the full width of the part and is not outlined, so that the saw must be guided along each edge of the print instead of cutting along a thin printed line. There is no objection to this, especially if the colour of the ink is not black, which is not so pleasant or easy to cut to as brown or some lighter colour. The colour is of small importance in a good light and if the work is only pursued for a short time, but other things being equal, we prefer a design in another colour, especially when working continuously. So far as the printing itself is concerned and general accuracy, the best English designs are unsurpassed, for every detail of the outline is given with the greatest clearness. American designs are very much on a par with the English, though not so well printed as a rule. There is a great want of delicate feeling noticeable in many of the larger designs, though some of them work out well. In size there is nothing to compare with some of the larger American designs, while the ingenuity with which really important looking pieces of furniture capable of being made by the fretcutter have been devised is remarkable. For the beginner, such things are out of the question. The prices of English and American designs vary in price according to size and other qualities, and are more costly than most others.
The German designs have earned a well-deserved reputation for
|
|
|
|
|
|
|
|
|
|
|
|
|
|
|
|
|
|
|
|
|
|
74 FRETWORK AND MARQUETRY.
general excellence, and for artistic effect are far ahead of either English or American. They are printed in a pleasant tone of brown in outline, with the space filled in by lines more or less representing the grain of the wood, the waste to be cut out being left blank. In connection with the fact of these designs being drawn in outline, we may remark on a feature which if left unexplained might possibly cause the novice some little confusion and prevent his work being accurate. We allude to the outline not being of uniform thickness, for in order to give an indication of shadow the lines on the right-hand sides and bottom of the parts forming the design are printed more thickly than those opposite to them. This undoubtedly improves the pictorial effect of the designs, though at the expense of accuracy till the way of treating the thick lines is understood. When it is, no difficulty can arise, nor would possible defects from this cause be noticeable if the cutting otherwise were inaccurate. In cutting through the thin portions of the line no confusion as to what is intended can arise, but the other lines are occasionally so thick that a graceful curve may be marred unless attention is paid to the position of the saw with regard to the line. The line is considerably wider than the saw-kerf, so that the saw may be worked through the line without the fret being accurate. In large work the defect may not be discernible. The extra thickness of the line represents shadow, which does not require to be cut through. When sawing, it ought to be disregarded, and the saw should be guided by the inner edge.
The German designs are sold at a low price. One thing in connection with these is noteworthy, and that is the distinctness of the styles in which they are drawn. Few of the designs are for articles of large size, by which we mean important pieces of furniture, as the artists appear in most instances to have recognised that fretwork has its limits, and that everything cannot appropriately be formed with it. It must not be inferred that only trivial things can be made from these designs, for most of them are distinctly both useful and ornamental.
The Italian designs are not so well known as they deserve to be in this country. They are printed in solid blue colour on sheets of uniform size, and are sold at a cheaper rate than most of the English designs, though they are slightly higher in price than the German, to which reference has been made. The delicacy of treatment is very marked in nearly every design, and many of the finest cannot be adequately cut without considerable
|
|
|
|
|
|
|
|
|
|
|
|
|
|
|
|
|
|
|
|
DESIGNS FOR FRETWORK, ETC.
75
skill. The prevailing style in which most of the designs are composed is that of the Italian renaissance—perhaps the most graceful of any for purely decorative purposes. Taken as a whole, the Italian series of which we are speaking is unsurpassed by any for inlaying either in two colours or for adaptation by the marquetry-cutter. From the small size of many of the articles they are also well adapted for working up in comparatively costly materials, and we know of none which so well repay for making them up in xylonite as inlays. Any amount of care may be bestowed on some of these designs in connection with this material without feeling that it is wasted, in fact it is a pity to cut some of them in any common wood. We may mention that we recently spent over a day and a half in making an inlaid panel measuring only 9in. by 2 1/2in. As there are eight similar panels to form the completed article, our opinion on the value of some of the Italian designs will be understood without further comment. Many of the designs are comparatively simple, but even they will be more appreciated by those who have made some progress in fretcutting than by the tyro. It may be interesting to mention that the principal Italian design, and undoubtedly the finest and most important one which has been produced anywhere, is that for constructing a model of Milan Cathedral, one of the most beautiful buildings in existence. The magnitude of this piece of fretwork may be estimated when we say that it contains over 3,600 pieces, and that the completed model is 6ft. long, 3ft. wide, and 4ft. 6in. high. So far as we can ascertain it has not often been made. Needless to say that this piece of work is not suitable for a beginner.
Although there are many publishers in France and Belgium and elsewhere, their designs are not easily obtainable in this country, so that beyond calling attention to their existence no mention need be made of them.
We may now suppose that a design to be worked has been decided on and obtained as well as suitable wood, and that the manipulation of other necessary things in the way of tools is understood, so that the learner will be ready to accomplish his first piece of work. If he is wise he will not attempt anything complicated or difficult to make up, for the chances are he will fail with it, and a simple design well done is better than a more pretentious one faultily executed.
With regard to the wood, there should be some appropriateness between it and the character or style of the design, for though
|
|
|
|
|
|
|
|
|
|
|
|
|
|
|
|
|
|
|
|
76
FRETWORK AND MARQUETRY.
this may be of comparative unimportance with small simple articles such as the beginner is recommended to confine himself to for a time—i.e., it does not much matter what kind of wood they are made of—in more important articles a certain harmony between the wood and the design may greatly enhance the artistic value. No definite rule with regard to this can be laid down, but to illustrate our meaning we may take the model of the Milan Cathedral. Were this to be made of ebony, mahogany, walnut, or any brightly coloured or dark wood, anyone who knows that the original building is made of marble would at once experience a feeling that there is something discordant about the model. Clearly this would be better if made of some white wood, such as holly or ivory-grained xylonite ; while no one with any sense of fitness would think of making up the model of an old " German House" in either of these, but would choose a dark wood, such as walnut, relieved perhaps here and there with lighter pieces. Again, what more appropriate for odds and ends in the Gothic or Elizabethan styles than oak, or in the Rococo (Chippendale) than mahogany.
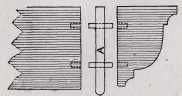
Perhaps for a commencement nothing can be better than mahogany, walnut, or oak, and its thickness should be regulated by the design. On most of these the thickness is indicated, if not in words and figures, by sectional drawings. Possibly these may be across some part of the design, and unless explained might not be understood. A sectional drawing expressed in the plainest terms means merely that it represents a section or cutting across any portion of a piece of wood or a collection of pieces built up together. Thus a full - sized sectional drawing of a piece of wood 1ft. square and 1in. thick would measure 12in. long by 1in. wide, or, to take the more elaborate example named, if a box were represented in section we should have an exact representation of the thickness of the various parts with outline of mouldings, etc., as they would appear were the box to be cut through from top to bottom at the centre. In practice, sections, if they are shown in a drawing, are represented by a series of lines sloping parallel with each other. Contiguous pieces of wood are shown by the lines being sloped in a different direction, so that there is seldom any difficulty in distinguishing them. All the same, it is not always easy in any but the simplest forms of construction to understand at first sight the relationship of the various parts to each other. A sectional or working drawing, whether in full size or section, must be
|
|
|
|
|
|
|
|
|
|
|
|
|
|
|
|
|
|
|
|
|
DESIGNS FOR FRETWORK, ETC.
|
|
|
|
|
|
|
|
|
studied before its meaning becomes quite clear. Some are naturally quicker than others in grasping this, and no doubt practice gives speed; just as in reading no one would expect to master the contents of a book by merely glancing through its pages, so with working drawings, they must be read and studied line by line till they are mastered, and to the novice they are written in an unknown language which he must learn. In the designs for fretworkers prepared for amateurs, his progress is considerably helped by the same parts in various positions, such as plans and sections, being lettered to correspond with each other. If these be read or gone over carefully there will seldom be any unconquerable difficulty in deciphering what at first seemed a meaningless conglomeration of lines. Even in this case, however, it is doubtful if what may be called a working drawing is not more or less unconsciously formed in the mind of the worker, or at any rate a plan of the construction elaborated. To do so is, however, to proceed by little more than guesswork, and is not to be depended on except in constructions of the very simplest kind, for loss of time and perhaps ultimate discomfiture is certain to be the result if anything elaborate be attempted without a working drawing. It may seem to be a waste to spend time over this, but in reality a saving is ultimately effected, not only in time but in material.
Where working drawings are not necessary, or where the necessary labour would be involved in making them explicit, a few explanatory words are generally given. In the Italian designs, working drawings proper are conspicuous by their almost entire absence, but the parts fitting together are so clearly and simply marked on the designs themselves that we cannot be sure that the plan adopted is not preferable for those who do not care to learn to understand the more complete and workman-like drawings.
The thickness being determined on, the next thing will be to get. the design on the wood, and there are several methods by which this may be accomplished, each having advantages of its own.
The simplest is to stick the printed design itself on the wood and use it as a guide in cutting, but this is objected to by those who wish to keep the original design uninjured, as it is destroyed when fastened to the wood and cannot be used again. If it is desired that the original should be preserved, a copy of it must be taken in some way, either on paper to be stuck on the wood afterwards, or on the wood direct. A brief description of the various ways by which this may be managed will be useful.
|
|
|
|
|
|
|
|
|
|
|
|
|
|
|
|
|
|
|
|
|
78
FRETWORK AND MARQUETRY.
One of the most popular and useful methods is to trace the design on thin tracing paper. This paper is so thin and transparent that when laid over the original designs the lines are plainly seen through, and can be drawn on it either with pen or pencil. Either pen and ink or lead pencil may be used, but the former is to be preferred, as lines made by the latter are apt to become indistinct by being rubbed and handled while the wood is being sawn. In addition to ordinary tracing paper, any kind that is sufficiently transparent to allow of the lines being seen through it may be used, and we ourselves prefer the thin paper which is generally used for typewriter purposes. Whatever kind is used, it is stuck on the wood precisely in the same way as the original design would be.
Another popular method is to take copies by means of carbon or transfer paper used for manifold writing. On the table, drawing-board, or some smooth level surface, lay the sheet of paper on to which the design is to be transferred, above it lay a sheet of carbon paper, and on top the design. With a hard pencil, or better still a style like those used for manifold writing, go over the outlines of the design with a fair amount of pressure and they will be transferred to the bottom sheet. By placing transfer and carbon paper in alternate layers several copies of a design may be taken at once. The original will have black lines on the back of it if the ordinary transfer paper, blackened on both sides, is used, but those who wish to keep the originals clean may do so by using transfer paper which is only prepared on one side. Although theoretically the original is not injured by the adoption of this course, in practice it will be found that as it is the sharp point of the style cuts through or tears the paper, so that after a few copies have been made it becomes comparatively useless. If preferred the design may be traced direct on to the wood by means of transfer paper, and this plan will generally be found all that is necessary, as rubbings, explained later on, can be taken from the wood when it is fretted, and used as patterns if any duplicate frets are wanted. It is not practicable on very dark woods, such as rosewood or ebony, unless they are previously covered with light paper stuck on them. For light woods or even walnut there is no better plan than transfer ring direct to the wood. As the advantages of transferring direct may not be apparent to the novice, it may be well to point out to him that if paper is stuck on the wood it must be scraped or be removed by rubbing with glass-paper, and that to do this thoroughly is sometimes a tedious and always an uninteresting occupation.
|
|
|
|
|
|
|
|
|
|
|
|
|
|
|
|
|
|
|
|
|
DESIGNS FOR FRETWORK, ETC.
|
|
|
|
|
|
|
|
|
With designs transferred direct this is avoided, as the wood only requires a slight " papering up" or rubbing with glass-paper in order to clean it. When tracing in any way, care should be taken to prevent the design shifting ; were it to do so a faulty transfer would be the result. This may be easily managed by fastening down with drawing pins, or placing a weight of some kind on the paper. Straight lines should be ruled. It must not be expected that the transferred design will look so well as the original, but any trifling irregularity can be regulated when sawing, so that with reasonable care in making them the transferred lines will be sufficiently accurate for ordinary purposes.
We have stated that a design if stuck on the wood is destroyed in the cutting, and as there is a notion held by some amateurs that this latter need not be the case, a few words about this may not be amiss if only to warn novices against adopting a wrong course. Naturally when a sheet is stuck on the wood and fretted, only the waste is removed, so that to all intents and purposes the design remains intact. If, therefore, this paper be separated from the wood, as it undoubtedly may be, it can be stuck on a fresh piece and used again. So say these would-be wise ones who have advocated this economical plan. Now let us see how it works. To get the design, which is a replica in paper of the fret from the wood, it must be thoroughly wetted, and of course this cannot be done without wetting the wood. We have even seen it recommended that the wood should be soaked in water till the paper floats off. As the moisture is prejudicial to the wood in proportion to its extent, is it necessary to say anything more about this senseless method ? The design may with care be got uninjured, but the fret itself will certainly be damaged to such an extent that considerable trouble will have to be taken to restore it thoroughly, even if this be possible.
A less objectionable plan—indeed, occasionally a desirable one, when the design is to be cut direct and to be preserved, minus the waste pieces of course—is to paste it on a piece of cardboard, or better still a piece of very thin soft pine which can be attached to the board to be fretted by means of fine wire nails driven through the margins and waste pieces, and clenched over so that they do not project from the wood, or by a little glue at the waste Parts. Unless these or a sufficient number of them are large, there is a risk of glue getting in between parts of the design, in which case damage is likely to result either to the fret or to the pattern one. Another way of attaching two or more pieces to be sawn at
|
|
|
|
|
|
|
|
|
|
|
|
|
|
|
|
|
|
|
|
|
80 FRETWORK AND MARQUETRY.
the same time is by means of a piece of paper glued between them. The pieces can then be separated more readily than if they were glued directly together, by inserting a thin knife blade between them—this tears the paper. When moderately thick wood is used this plan can be adopted with safety, but it is not suitable, though it is often recommended for veneers or for anything less than, say, 1/8in. thick. The exact thickness cannot be stated, for much depends on the fragility of the wood, fineness of the fret, and so on. The risk of any damage occurring may be diminished by using narrow strips of paper, preferably of a soft thick kind, placed at intervals instead of one piece the size of the wood, but wire nails are on the whole more convenient. Yet another plan by which what is virtually a replica of the original design, less the waste pieces, may be obtained even though the original itself be destroyed. As it is often requisite to have duplicate pieces of fret, and just as easy in many cases to cut two or more at the same time as it is to cut one, the original design may be stuck to the top piece of wood and a sheet of paper, not glued, inserted between all or any of the others, which will be fastened together with wire nails. The inserted sheets of paper are cut through by the saw along with the wood, and on separating them present exactly the same outline. When necessary, several sheets may be inserted between two pieces of wood, and any of them be afterwards used instead of the original pattern. One advantage and often no small one, of putting paper between the pieces of wood, is that it may be used to lubricate the saw-blade. All that is necessary is to grease the paper beforehand. The best grease for the purpose is Russian tallow. The reason that tallow is to be preferred to some other kinds of grease is that it is sufficiently hard not to injure the wood by soaking into it as an oil might do. When a large quantity of frets of the same pattern are required it is not unusual to substitute a piece of thin zinc for the paper between two of those first cut, and to use it for the purpose of reproducing the designs. The zinc fret is used as a stencil, so that the design on the wood appears in the natural colour of the wood, the waste being darkened according to the colour of the ink or paint used. Printed copies can easily be taken on paper from such thin metal frets by passing an ordinary inked printing roller over one side, which is. then by pressure printed from. An almost unlimited number may be taken by this means, which it may be useful to be aware of. The wooden patterns above referred to may be used in a similar manner, but not so conveniently.
|
|
|
|
|
|
|
|
|
|
|
|
|
|
|
|
|
|
|
|
DESIGNS FOE FRETWORK, ETC.
81
A simple and easy way by which, to transfer designs direct to the wood is by using a copying ink pencil, either for the purpose of making a tracing on a separate piece of paper, or by going over the original design. The wood is to be moistened and the ink drawing pressed down it. Instead of water being used to moisten the surface of the wood, ordinary flour paste is to be preferred. The wood should be well smeared with this, and the paper then be pressed down, but instead of leaving it till it is stuck, remove it before the paste is dry. Occasionally several copies can be taken from the same drawing.
Designs may also be multiplied by means of any of the graph and other copying apparatus now so much used, but it is rarely that the amateur at any rate will have occasion to take many copies before cutting the frets, and he can then adopt simpler means.
Many other methods of getting the design on the wood have been and are practised and may occasionally be useful, though in the case of cheap designs it may be doubted whether the game is worth the candle in the majority of cases, and whether it is not better to use the original design to cut directly from. This, however, must be a matter for personal consideration We think it is false economy to trace and transfer an elaborate design from one of the low-priced sheets. If the design is a costly one, or difficult to obtain, it is a different matter altogether. Among the methods to which reference may be made is that of sticking the original design on cardboard and then cutting away the waste with a penknife—making, in fact, a cardboard fret. From this rubbings may be taken as from a wooden fret. As these rubbings are so easily made the sawyer will not find it a troublesome matter to take them from all his work. All that is wanted besides the paper, of which almost any kind will do, is a piece of heel-ball, obtainable from a shoemaker. The paper is laid on the fret and simply rubbed with the heel-ball, which marks black on the pattern but leaves the waste untouched.
In addition to mechanical means of reproduction, of which those mentioned are the principal or usually adopted, the aid of photography may be enlisted. There are several photographic printing processes which are sufficiently cheap and easy to make them available by the fretcutter. That known familiarly as the "blue process " or Cyanotype is notably one of these. Almost any kind of paper may be used in it with sufficiently good results, only two cheap chemicals are required, toning is unnecessary, and
|
|
|
|
|
|
|
|
|
|
|
|
|
|
|
|
|
|
|
|
82 FRETWORK AND MARQUETRY.
fixing can be done with water only. The paper may be bought ready sensitised, but we recommend the user to prepare his own, as the process is not difficult. The chemicals are ferri-cyanide of potassium (the red prussiate of potash) and ammonia-citrate of iron. An ounce of each will last for a long time. Dissolve each separately in about four times its bulk of water, and keep the solutions in separate bottles. The sensitising of the paper should be done in a dull light. It is not necessary that the same care should be used as with ordinary photographic plates, still the darker the room the less risk of the colour changing before it is wanted. Equal quantities of the two solutions must be mixed just before they are required for use, and then lightly sponged or brushed over the paper with a soft brush. A very little of the mixture goes a long way, and what is left over may as well be thrown away, as unless kept from light it will soon become worthless. Separately the two solutions keep well, especially in a dark place. After, the paper has been sensitised it should be left to dry in the dark, after which it will be ready for use. As a printing frame of the usual kind of sufficient size to print many of the designs is rather an expensive affair and not likely to form part of the photographer's outfit, it will be very satisfactory to know that a printing frame of any kind may be dispensed with. A flat board of sufficient size to allow the design to be laid on it, a piece of felt, baize, or cloth, or even some sheets of paper to form a padding, and a sheet of glass are all that is necessary. If the glass is of the kind known as " plate," it will be better than the thinner varieties of sheet on account of its weight. To use this very simple substitute for a printing frame, lay the padding on the board, then the paper with its sensitive side uppermost. On this lay the design, and finally on top the plate of glass. Place in the light, with the sun shining on it, if possible, and leave till printed. The progress of the printing can be ascertained from time to time by sliding the glass a little on one side and turning up the portion of the design thus left free. As soon as the paper, except where the lines show, has turned a dark blue with a somewhat metallic lustre the printing is complete. When moving the glass before and after examining the print, be careful not to disturb the relative positions of the design and the printing paper. The print may be developed and fixed by soaking and washing it in several changes of water till there is no yellow visible. Where the water is "laid on " it will suffice to put the print on a board and let the water from the top flow over it. Hot water washes more quickly than
|
|
|
|
|
|
|
|
|
|
|
|
|
|
|
|
|
|
|
|
DESIGNS FOR FRETWORK, ETC. 83
cold. As the unfixed chemicals are washed away the design will show out clearly in white on a dark fine blue ground. If the exposure has been misjudged, either by unduly shortening or prolonging it, no great harm will result. The print will not be technically perfect, but it will probably show all that is necessary with sufficient distinctness. This to some extent will also depend on the density and colour of the ink of the original design, which may be rendered less opaque by oiling it, so that the printing on the blue paper is more rapidly effected. One of the best oils to be used for the purpose of making the paper clearer is castor oil, as it is colourless and penetrative. Any excess should be wiped off before it is put in the " frame" in order that the blue print may not be greased.
An even simpler process than the one described is that in which bichromate of potash is the sensitising medium, but it is not so satisfactory, as the results are not so distinct. The colour of these prints is brownish with white lines, and with the exception of the chemicals used the process is exactly the same as the other.
If paper is to be stuck to the wood, either glue or paste may be used. For some reasons the latter is preferable, but it should be strong, so as to cause good adhesion all over, and free from lumps. It may easily be made by stirring flour into boiling water. If glue is used, it should be thin for this purpose. Strong dextrine is also good. Whatever is used, care should be taken not to wet the wood more than can be helped, and it would be better if the designs could be laid without any moisture. Of course this is impossible, and the only thing is to counteract bad effects as far as may be, for they cannot be avoided altogether. Thus, if the adhesive is put on the paper, this extends in size, and after being laid on the flat wood contracts as it dries and may cause the board to bend hollow.
If any tendency to twist is observable or is feared, the best way is to let the wood remain under a weight to keep it flat till dry, when the chances are it will remain so. With small narrow pieces such precautions will seldom be necessary, and they may be worked at almost directly if dried near a fire. To lay the various parts of a design as they appear on the sheet would of course entail a considerable amount of waste of wood, and this is not desirable. In order to avoid waste, care in the arrangement of the pieces may be advisable in order to make them fit as well as possible to each other. To do this, cut each portion of the design out with as little waste paper about it as convenient, then lay
F 2
|
|
|
|
|
|
|
|
|
|
|
|
|
|
|
|
|
|
|
|
84
FRETWORK AND MARQUETRY.
them loosely on the wood till the arrangement seems satisfactory. Sometimes a good deal of saving may be effected by laying the designs, or rather portions, alternately on each side of the wood, which is the same in effect as if transparent and therefore reversible tracing paper were used. When laying the design or any portion of it, be careful to notice which way the grain of the wood runs, and place the design accordingly. As a rule it would be a fault to have the grain awthwart or diagonally across any portion of the design. Uniformity and fitness will best be conserved by seeing that the grain of the wood is in the direction of the greatest measurement. This system cannot, however, be invariably followed in fretwork articles, as may be gathered from the following instances. Let us first take a bracket composed of a back, a shelf, a support for this projecting from the back, and an ornamental piece of fret by way of backguard appearing above the shelf. As a matter of fact, in most designs this guard would be in one piece with the rest of the back, but there is no reason why it should not be cut separately. Now the grain in the part of the back below the shelf will naturally be perpendicular instead of across. Unless the continuation of the back is evidently to appear as an added piece, in which case the grain will run in accordance with the general rule stated from side to side of the shelf, it will follow the direction of the remainder of the back, in which case it might, without explanation, seem that the ordinary structural principles were neglected. It is, however, the exception which proves the rule, only the rule should not be slavishly adhered to when a departure from it may render the whole structure more harmonious in appearance.
When the design is on the wood, the next thing will be to cut it out, and here the real special work of the fretsawyer commences. Holes must be drilled in each waste piece, and these should all be made before any sawing is begun, as the risk of breaking is diminished. This is trifling if a drill is used. Of course the sawyer is in a hurry to cut the design out just to see how it looks. We know all about that, but we crave his patience just a little longer on what may at this stage seem an unimportant or trivial matter. Let him remember that each portion of the design is but a part of a whole. Is it only a box or a bracket or some equally simple thing, it must still be made up, unless the parts are to be nothing more than waste fret. Now, leaving the scrolls or fret lines, the borders or outside lines may look alright on paper, but if the wood is cut to them it will very likely require some modification before all the parts fit as accurately as they
|
|
|
|
|
|
|
|
|
|
|
|
|
|
|
|
|
|
|
|
DESIGNS FOR FRETWORK, ETC.
85
ought to. It may be that only a shaving or two requires taking off, or a little easing here and there. Well let this be done before the fretting. But it may be said if the designs are accurate the parts must fit properly together, and we quite agree that they will if the designs are as stated. That they are not drawn so by the original draughtsman we cannot undertake to say, but what with the paper having been damped and consequently very likely been distorted to some extent and sundry other causes the designs are often a little " out" by the time the fretcutter starts to saw them. It can do no harm, at any rate, to test them by fitting them together, and it is better to do so before sawing and of course remedy any defects which may become apparent. The reason is that after the work has been fretted the liability to breakage will be greater than if the fitting is done while the wood is in the solid. Straight outside lines may as well be cut with an ordinary saw instead of the fretsaw, working slightly rather outside than inside the line. When necessary, corners should be tested with the square, as, for example, the back and top of the projecting piece of most brackets. If they do not form a right angle, of course the shelf which rests on the top will slope either to the back or front, and either would be objectionable. With the aid of the shooting-block the plane should be used to shoot the edges correctly. As more extended remarks will be found in a future chapter on fitting and making up articles of fretwork, nothing more need be said here on these points which we have merely hinted at.
Before actually beginning to saw, it will, especially if a machine with a presser foot is being used, be just as well to look at the tinder side of the wood and note if there is any burr or raised wood round the edges of the holes. If there is, let it be removed either by rubbing down with glass-paper or by cutting with a knife, chisel, or other sharp tool. If left, these rough or raised parts might cause the wood to become jambed between the table and the presser, and so interrupt the regular feed of the wood to the saw which is so essential to comfort and accuracy. The sawyer ought to be able to put in practice the principles explained in cutting, for the most complicated and elaborate design is nothing more than an arrangement of various curves and lines, each one of which must be cut separately. There is, therefore, no reason why anyone who can cut an easy-looking design—easy because it has only a few spaces or holes—accurately and well should not attempt a more elaborate piece of work. The chief
|
|
|
|
|
|
|
|
|
|
|
|
|
|
|
|
|
|
|
|
86
FRETWORK AND MARQUETRY.
difference between the two is that this has more holes and will consequently require a longer time to execute.
With a few general hints on cutting, this chapter may be appropriately closed. The order in which the holes are cut is a matter of secondary importance, but weak members should have as much support as possible left till the bulk of the work has been prepared. Usually it is best to cut the insides or holes first, leaving the outlines till the last, but this plan is not always convenient. If the outline consists merely of a plain scroll, it does not matter when it is sawn ; but if there are points or weak projections from it, it is better to leave it till the last. As, in spite of all care, a piece will get broken off occasionally, it may be satisfactory to know that unless the broken part is lost it can generally be stuck on so neatly with glue that the fracture can hardly be detected. If the piece gets lost the best way to repair the damage is to cut the broken part of the fret through with the saw, so that it may have a clean edge, and if possible with the grain, which will seldom be difficult, as a fracture rarely occurs across it. Glue on a piece of wood of the same thickness as the remainder of the work and with grain matching as nearly as can be at the joint, of sufficient size to allow the missing member to be cut in it. When the glue has set and the joint is consequently firm, draw in the missing out-line and saw to it. If a member or portion of a design betrays any exceptional weakness, as it sometimes does, either from a local flaw in the wood or from other causes, the part may be strengthened by glueing a strip of calico on behind. This plan, of course, cannot be adopted when both sides of the fret are visible in the completed design when made up, but it may be sufficiently often to render its mention desirable.
|
|
|
|
|
|
|
|
|
|
|
|
|
|
|
|
|
|
|
|
CHAPTER XI
MAKINg up Fretwork Articles.
IN this chapter no pretence is made that directions are given for fitting together and making up all and sundry the articles which will come before the notice of the fretcutter. To do so would be impossible; there are, however, several leading principles and methods of manipulation which the cutter should make himself master of so that he may to a considerable extent be independent of the assistance of others. To be so thoroughly is almost out of the question, as it would then be necessary for him to be not only an expert fretsawyer but equally conversant with cabinet-making and French polishing besides.
Let us suppose that some wood has been got in a rough state. It requires smoothing. This will be done first by the jack-plane if the surface is very coarse, and finally with the smoothing plane, which should be set finely and have a sharp cutter so that only thin shavings are removed.. In the event of a jack-plane not being handy to the worker, any carpenter can do what is required, or at a pinch the smoothing plane may be used alone. If necessary the scraper may be used after the plane, either before or after the wood has been fretted. The final cleaning and smoothing will be given by means of glass-paper. Coarse grades may be used to remove the paper of the design remaining on the wood and the finishing touches be given with the finer kinds. The finest papering up will not be given till the last thing, i.e., after all the parts have been properly fitted together and are just ready for polishing, for most of the things should be polished in some way or other.
The edges of pieces of wood must be shot true and at the proper angles. If the straight edges are cut with the fretsaw they will be irregular, and the work will be more than if cut with an ordinary saw. This will leave the edges rough, and
|
|
|
|
|
|
|
|
|
|
|
|
|
|
|
|
|
|
|
|
88 FRETWORK AND MARQUETRY.
unless used with considerable skill very likely a little out of the true. To regulate them, plant the wood firmly against the stop of the shooting-board, with the edge to be shot or planed slightly overhanging the edge of the board which guides the plane. This laid on its side in cutting must make the edges square if carefully applied. Mitres are trimmed in the same way by using the mitre block. To prevent confusion, it should be said that the mitred corners of boxes, tray, etc., cannot be cut in this manner, as the mitre block is only of use for frames, mouldings, and such like pieces. For boxes the mitre can be shot true by laying the pieces on the shooting-board, but instead of being flat let them be inclined at an angle in accordance with the number of sides of the box.
Those who do not possess a shooting-block with adjustable board may make use of the ordinary form by raising the wood to be shot to the proper degree by placing triangular blocks under it. Another method is by the use of the mitre bevel.
As some assistance towards accurate workmanship, those who have none of the aforementioned appliances may get blocks of wood cut at angles to correspond with those in the articles to be made up. These blocks—of which only one for each form will be required—can be prepared by any carpenter or cabinet-maker. They are to be used as guides. By planing the edges of the tray or whatever is being made as accurately as possible by eye, the fit can easily be tested by holding them together outside the prepared block, and planing, as may be necessary to ensure a correct and closely fitting joint. Those who are conversant with the use of the square will see that these blocks are designed to take the place of both it and the bevel. Probably one block each for octagonal, hexagonal, and square covers will be as many as the amateur will require.
Sides of boxes, etc., should be glued together, and the joint may be further strengthened by the use of nails or screws. The appearance of the heads of these is not desirable, especially in mitred corners, and they cannot always be used. Keying with thin pieces of wood or veneer may be adopted with advantage. This is managed by making a saw-cut in a slanting direction from the corner upwards and downwards, and then forcing in a thin bit of glued veneer to fill up the cut. When dry, the edges are smoothed off level, so that the joint is hardly discernible. This keying is frequently adopted in small fancy wooden boxes, so that if the construction is not understood the reader is advised to examine any small boxes (desks, work-boxes, etc.).
|
|
|
|
|
|
|
|
|
|
|
|
|
|
|
|
|
|
|
|
|
MAKING UP FRETWORK ARTICLES.
89
All glued joints should be kept close by pressure till the glue has set. The glue should be hot when applied, and as much as possible be squeezed out between the edges of the parts being joined. An excessive quantity of glue in a joint is a source of weakness, not of strength. Glue which exudes should be scraped away before it becomes hard. In order to keep glued pieces together tightly till the glue has set it will often require the exercise of some ingenuity.
Many corners or angle joints just glued without nails or keying may have additional strength given to them by glueing strips of canvas or calico along them. This plan can only be adopted inside constructions, or at the back where it will not be seen. In boxes, which are often lined inside, it may be easily managed. Fretwork articles are not intended to be handled roughly, so the joints which are used in ordinary joinery where strength is essential are not required. This enables the fretcutter to do what may be necessary with a very limited knowledge of joinery. Precision is more what is wanted than a close adherence to the ordinary rules of construction.
|
|
|
|
|
|
|
|
|
In addition to angle joints or corners there are other forms in which one piece is, as it were, stuck on to the face of another piece. A familiar instance of this is the projecting part of a bracket on which the shelf rests— except at the back. Such a piece may be glued and screwed, or nailed from behind, but occasionally the wood is too thin to allow of either screws or nails being used easily and safely. Glue alone might do, but it is better to leave a tenon or two projecting from the back edge of the projecting piece, as in fig. 45. These tenons will fit into mortises or holes cut for them in the back piece, and when glued up the parts will be firmly fixed. Designs are often seen in which this
|
|
|
|
Fig. 45. Tenons to Bracket Support.
|
|
|
|
|
|
|
|
construction is shown, but where it is not it may often be adopted with advantage. The mortise and tenon should fit each other accurately, and their position should be so arranged as not to interfere with the design. The length of the tenon should not be greater than the thickness of the wood in which the mortise
|
|
|
|
|
|
|
|
|
|
|
|
|
|
|
|
|
|
|
|
|
|
|
90
FRETWORK AND MARQUETRY.
is. The mortise being straight may be cut with either the chisel or the fretsaw. If with the latter, let the hole be made rather small in the first place and enlarge it with the chisel till the tenon just fits in tightly. If made neatly and skillfully, the fact of a tenon joint being used should not be discernible except
at the back.
Having a certain resemblance to the mortise and tenon joint is
|
|
|
|
|
that made with dowels or wooden pegs, which, though not a common one in fretwork, is yet occasionally more useful than any other. The dowel or peg may be compared to a nail, only instead of being inserted from the outside it is stuck into one piece of wood and the adjoining piece,
|
|
|
|
|
|
|
|
Fig. 46. Dowels to Bracket Support.
|
|
|
|
|
|
|
|
which has a hole to correspond, is forced down into it. It will be seen that a dowelled joint gives no indication of its character from the outside, and so far as appearance goes
resembles a plain glued joint. Glue is used both on the dowels
|
|
|
|
|
|
|
|
and on the parts of the wood which come in contact with each other. Fig. 46 illustrates an example where the dowel joint is useful. There are two sides, or portions of a side, with the shelf A intervening. The dowel pin is driven through this and into corresponding holes in the ends of the
|
|
|
|
|
Fig. 47. Box with Frame Top.
|
|
|
|
|
|
|
|
sides. The thickness of the dowel must depend on the thickness of the wood used. The pins should fit tightly into their holes, which should be quite filled without any empty space
at the ends. This is especially necessary when the diameter of
|
|
|
|
|
|
|
|
|
|
|
|
|
|
|
|
|
|
|
|
|
|
MAKING UP FRETWORK ARTICLES.
91
the pins is nearly as great as the thickness of the wood into which they are driven.
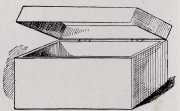
When making up boxes which have a lid fitted to a frame, that is, when a rim of wood is below the top in the same way that the ends, back, and front are above the bottom, as illustrated in fig. 47, it is not a bad plan to have both parts of the front, ends, and back fretted in one piece of wood, and separate them afterwards into the portions for the top and bottom. The lid portion can easily be cut off with an ordinary saw, and the edges smoothed down by planing or papering.
A fretwork box is to some extent a misnomer, for it would rarely be of any use if made up only of fretted wood, for the simple reason that if the holes were not covered in behind, the contents would not be secure from dust or from falling out. On this account, therefore, fretwork boxes are generally lined with some material, such as silk, velvet, cardboard, paper, or wood. In this latter case the lining may almost be regarded as the box on which the fretwork is laid as an outer covering. The fretwork may be made up as the box, and the lining of wood be glued to it inside. A better way is to make the lining into a box, and fasten the outer frets on afterward, fitting them accurately. The corners of the fret pieces should be mitred, and as the inner box will afford sufficient support they need be neither keyed nor nailed. They need not be thick, and good effects may be obtained by using only veneers. The frets are stuck on to the box with glue. If used in excess, so that it exudes from under the edges, there will be a difficulty or at least some tedious work will be required to clean it away. To ensure perfect contact between the fret and the box, small clamps, such as those mentioned in connection with the cutting-board, will be found useful, or the ordinary hand-screws of the cabinet-maker may be used. With these more pressure may be got. If there is a sufficient number, the frets may be laid at the same time, otherwise it will be better to do each one separately and wait till the adhesion is perfect before loosening the clamps. As, the manipulation of all the parts is the same, whether done at intervals or in quick succession, so that all the parts are clamped at the same time, let us suppose the front of the box only is to have the front laid on. Proceed as follows :—Let a smooth piece of wood of any kind and thickness and not smaller than the front of the box be heated at the fire. It should be not merely warmed, but moderately hot. To explain what is wanted it may be said that the board or caul should be sufficiently hot to warm through
|
|
|
|
|
|
|
|
|
|
|
|
|
|
|
|
|
|
|
|
|
92 FRETWORK AND MARQUETRY.
the fret and partially soften the glue, so that the contact between the two woods is perfect and the excess of glue is squeezed out. It may be just as well to warm the fret before rubbing the glue on, and the box too. If the fret is only small, the caul may be dispensed with, though it will be better to use it. The fret being glued, place it without loss of time on the box front in its proper position, for it must not be slipped about. Place the hot caul against it, and by means of one or two clamps bind firmly together. By keeping the handles of the clamp screws outside the box there will be no difficulty in fastening them up. To prevent the inside of the box being bruised by the ends of the clamps, a piece of waste wood may be put against the inside of the front. The same may be done on the outside, if it is deemed unnecessary to use a caul. The clamps should remain on till the glue has set.
Other articles of fretwork may be treated in a similar manner, and the manipulation will be the same.
|
|
|
|
|
|
|
|
|
The inner lining or box need not be of the same kind of wood as the outside fret, as a contrast is sometimes desirable. Pencil cedar makes a nice lining. Black generally forms a good background, though if the fret is white the contrast may be rather too violent.
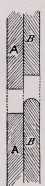
When making up fretwork boxes in this manner, a better finish may often be given by allowing the wood of the inner casing B to project a little above the edge of the fret A of the lower part, the wood inside the lid framing being correspondingly narrow, as shown in fig. 48, which represents the section of the front of a box so treated. When a box has a top without any framing, the wood to which the top fret is fastened may be made to fit within the box, on the edges of which the fretted lid rests, as represented in section by fig. 49. This plan cannot be adopted when the frets are cut in veneers. Many of the published designs for boxes may often be improved by having mouldings planted on at the bottom. When this is intended, the margin of the frets should be left an extra width. The mouldings at the corners should be mitred, and if desired, small round knobs be fastened on underneath to serve as feet. Another way is to shape thin pieces of wood with the fretsaw, and
|
|
|
|
Fig.
48.
Section
of Front
of
Box.
|
|
|
|
|
|
|
|
fasten them by glue at the corners under the mouldings. These
feet may take a variety of shapes and add considerably to the
appearance of the work. The moulding should to some extent
harmonise with the size of the box and of the parts of the
fret.
|
|
|
|
|
|
|
|
|
|
|
|
|
|
|
|
|
|
|
|
|
|
|
MAKING UP FRETWORK ARTICLES.
93
|
|
|
|
|
|
|
To use a heavy moulding with a small box or fine fret would be out of character. Unless there is some good reason to the contrary, even when the design does not show it, it will be better to thicken up the lid,
|
|
|
|
|
|
|
|
|
or, as is technically said, "line" it up. This is not necessary when the lid is provided with a rim. The " lining," as will be seen from the sectional drawing of a flat lid, fig. 50, consists of pieces of wood glued under the edges and not of any great width. They may project as shown, so as to form a moulding, which may be of any suitable design. Even when the fret is stuck on to another piece of wood these lining strips may be used, and by their aid the edges of the
box below may project, as in the case of a rimmed
lid.
|
|
|
|
Fig.
49.
Section of
Fretted Top.
|
|
|
|
|
|
|
|
They also serve to give sufficient thickness to the lid to allow of the screws in the hinges having a good hold. It is important to notice that the grain of the lining strips at the end of the lid should run in the same direction as that of the lid and of the back and front strips. When two surfaces are glued together the grain of both should correspond. In the case of a box or other article where the ends are fastened, attention to this is' not of such consequence as it is for doors and flat lids, such as those just alluded to.
|
|
|
|
|
|
|
|
|
|
|
|
|
|
|
|
Fig. 50. Flat Top with Ram.
|
|
|
|
|
|
|
|
A more fancy appearance may be given to boxes by lining them inside with silk, velvet, or some other material, and a few remarks regarding these and the way they may be used will not be amiss, remembering that many of them are applicable not only to boxes, but to many other articles, or even as a backing for any kind of fretwork.
Paper may be used as a backing, but there are obvious objections to it.
|
|
|
|
|
|
|
|
|
|
|
|
|
|
|
|
|
|
|
|
|
|
94
FRETWORK AND MARQUETRY.
Cardboard is somewhat better than paper, but only by reason of its increased strength, and it should be used chiefly in conjunction with silk or plush, or similar fabric. As the treatment of these is similar, they may be considered as one. In the case of a delicate fabric there would be great risk of injury from the paste or glue coming through, and there is the difficulty of getting the edges nicely trimmed without liability to fray. This may be avoided by knowing how, and taking a little care.
Let both sides of a piece of card be covered with the velvet or whatever is being used. If the edge of the fabric is turned over just sufficiently, so that its edge is covered by the margin of the fret, all unsightliness is avoided. When speaking of velvet in connection with fretwork the finer kinds of silk plush are referred to, for the coarser Utrecht or mohair velvet used by upholsterers
for covering furniture with is not so suitable. To stick the velvet to the card use glue, which should on no account be put on the velvet, but on the card. Cover the card with it, then press the velvet down gently, and no harm will result. Separate pieces of card should be used for the different pieces of the box, and the bottom one need only have one side covered, even if it is necessary to use card at all.
Done in the way indicated the inside of the box is plain or smooth, but an additional effect may be given by quilting and padding. This is not so suitable for velvet as for silk or satin. Cardboard is used as before, only instead of the covering being glued on all over its surface it is only fastened at the edges, which are turned over on to the side which is next the fret. The padding is got by using a little cotton wadding. This will give a plain padded inside to the box, and if it is desired to have it quilted sew through the silk and card at regular intervals so as to pull the wadding down tight at the stitches. To prevent these being visible, small buttons may be used to cover them, or tufts of silk, or anything of that kind. Small buttons or nails with split shanks are obtainable, and stitching may then be dispensed with, as the shanks are driven through silk and card and turned over behind. Whether quilted or plain padded, the back of the card, i.e., the side which fits against the fret, must be covered with a piece of silk, the edges of which must be glued down in such a manner that they will be hidden by the margin of the fret. When using this plain silk it is better not to stick it down all over, as if delicately tinted the glue might injure it, and there is no necessity for fastening it except at the edges.
|
|
|
|
|
|
|
|
|
|
|
|
|
|
|
|
|
|
|
|
MAKING UP FRETWORK ARTICLES.
95
When it is desirable that the contents of a fretwork box shall be partially visible and yet be protected from dust, the lining of the inside, except the bottom, of course, may be of glass. This is not a material which is commonly recognised as suitable for the purpose, but in such cases as that named it may be used with advantage. The upper edges should be ground smooth and polished.
Gilded backgrounds to frets may sometimes be used with advantage. Entire frets may easily be gilded. Of course, anything intended to be finished in this way need not be made in any choice wood, common pine will do instead and answer just as well.
Among the sundries are odds and ends of brass and metal work,, such as hinges, locks, escutcheon plates, etc. These things are much smaller than similar articles used for ordinary purposes, and they are not generally to be obtained at cabinet brass workshops.
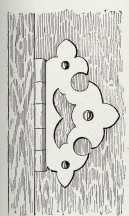
Hinges occupy a prominent place in making up work, and may be treated first. In fitting them, whether to doors or lids, it is of importance that they should be not only neatly but accurately fitted. If clumsily fastened they do not look well, and if they are inaccurate it is impossible for the door or lid to work nicely. The kind used most commonly is the butt hinge, and the fretworker will seldom have occasion to use any other. We may say that nothing sets off work so well as good brass-work, whether in hinges or anything else. The appearance of an otherwise well made and finished article is greatly lessened by the use of inferior qualities.
The size of the hinges must depend on the work to which it is applied. Practically any length may be used, but the width of the plate should very little exceed the thickness of the edge of the wood to which in most cases one of the plates has to be fixed. Possibly both plates may be fastened to edges, in which case if there is any difference in their thickness the hinge with be determined on by the thinner one. The joint of the hinge must project beyond the wood for very obvious reasons, so that this excess should be allowed for.
In order that hinged parts may fit closely together, the hinge plates must be sunk in the wood. When the plates occupy the full thickness of the wood this may most conveniently be done by running the saw across and neatly cutting away the wood between the kerfs with a chisel. Both hinge plates may be let into one
|
|
|
|
|
|
|
|
|
|
|
|
|
|
|
|
|
|
|
|
96
FRETWORK AND MARQUETRY.
of the pieces, or one into each of them, according to circumstances, of which a few particulars may be given in order to guide the worker. For all practical purposes it will be sufficient to consider that the ordinary butt-hinge is to be used in connection with doors of cupboards and lids of boxes.
When a door is hung it may be either within the ends top and bottom, or covering the edges of these parts, in which case it is, except for its upright position, to be regarded as a flat lid of a box. For the present it may be supposed that it is to be hung within the ends, this being the arrangement most commonly met with. Occasionally designs indicate the other, but it will generally be better to alter the construction. This may be managed in most instances by either making the case or cupboard large, or by reducing the margin of the fretted door. The hinge may be sunk either in the edge of the door or in the end of the cupboard, or partially in both of these parts. So far as actual utility is concerned it hardly matters which plan is adopted, though for convenience and in order not to increase work unnecessarily the hinge should be sunk in the edge of the door, unless there is some decided reason for adopting one or other of the alternatives. The grounds of preference for the course recommended may be stated, as the worker will to some extent be aided in knowing when to make a departure from it. Speaking broadly, the reason for adopting it is merely convenience and the reduction of the work of fitting to the minimum. It must be evident that it entails less work to cut a piece out of the edge of the door than to do so inside the end of the cupboard, and it is equally clear that no object can be gained by sinking one hinge plate into each portion. This is generally done, and is better, because if the heads of the nails project above the plate, as they often do slightly, they are not in the way of the door closing without straining the hinge. The best way to proceed when hingeing is as follows: Mark out the position of the hinges on the door edge. If the plates are not wide enough to occupy the whole thickness, mark their width on the edge. Saw across and remove the waste. If the hinge is a long one, one or two additional saw-cuts may be made between the two outer ones to facilitate the work of the chisel without tearing the wood irregularly. Open the hinge and screw down, or it the size is too small to allow of screws being used, small wire nails may be substituted. In almost all doors there are at least two hinges, and as a rule no more are necessary. Whatever the number, they should all be fixed in the same manner, and it will be necessary to see
|
|
|
|
|
|
|
|
|
|
|
|
|
|
|
|
|
|
|
|
|
MAKING UP FRETWORK ARTICLES. 97
that the pins or wires connecting the plates are in the same straight line and that they project equally. The hinges being on the door, put this in its place, open with the loose hinge plates as nearly as possible in their proper positions against the end. With a bradawl, pencil, or other sharp point, mark or bore one hole for each hinge in the wood, through a hole in the hinge plate. Then fasten with screw or nail as before. Then try if the door hangs satisfactorily, opening and closing easily. If it does, complete the fastening up of the hinges. Should it not, remove the one screw already inserted through each hinge and try again. The reason for only using one screw or boring one hole for each hinge is that alterations may be more accurately and easily made than if each hinge were fastened completely.
|
|
|
|
|
|
|
|
|
For similar reasons to those given for sinking the hinges in the doors when these are within the ends, the hinges will be sunk on the ends of the case when the door is hung outside them, and this applies equally to boxes with flush lids.
When boxes have tray or rimmed lids the hinges may be sunk in either part, or partially in both. A very easy and expeditious mode of adjusting them is to temporarily fasten the two portions of the box together, open with one or two clamps, the edges being flush with each other. The saw can then be drawn across, or if the box is too small to allow of this being done the chisel can be used instead. The waste wood is then removed and the hinges fastened as before. Instead of the ordinary butt-hinges being used for boxes, when it is desired to prevent the lid opening out, the
|
|
|
|
Fig. 51. Ornamental Plate to Hinge.
|
|
|
|
|
|
|
|
"stop butt" should be chosen. In details of fixing it is the same as the other, but a peculiar formation of the joint prevents it being
opened beyond a certain distance.
G
|
|
|
|
|
|
|
|
|
|
|
|
|
|
|
|
|
|
|
|
|
98
FRETWORK AND MARQUETRY.
A variety of hinge is that with ornamental plates for showing on the exterior of the box or door, but the directions already given will enable anyone to fix them. Usually they are simply screwed on and not sunk into the wood. Much the same effect may be obtained by using the ordinary butt and fixing on ornamental plates close to them on the outside of the work, as suggested in fig. 51, which represents a portion of a door so treated. Hinge plates for this purpose are to be purchased, but may easily be prepared by the fretcutter himself. They look best when fastened on with round-headed screws of the same metal as themselves.
Small doors may often be hung without hinges, as these are ordinarily understood by driving pieces of wire or pins through the top and bottom of the cupboard. Both pins must be in the same straight line, and if the door fits well the outer edge must be rounded to give clearance.
Second only to hinges in importance are locks and various kinds of catches for keeping lids and doors close. These are made in considerable variety, and many of the latter kinds of fastenings are very handsome in appearance. They require no special directions about fitting beyond that this should be neatly done.
Locks are usually constructed so that they require to be let into the edges of doors and the fronts of boxes. Care must be taken in doing so not to cut away too much of the wood, but to leave sufficient for the nails or screws which are used to fasten the lock in its place. Occasionally the wood may be too thin to allow of any or sufficient being cut away. In this case it may be advisable to thicken up the part where the lock is to lie, glueing on a piece of sufficient size and thickness behind the fret. The cutting of the keyhole needs considerable care. The chief danger to guard against is that of making it too large. To avoid this it will, when first making a keyhole, be better to err in the other direction and make it too small. The size can easily be increased by filing. As it may not always be possible to avoid making an unsightly keyhole in the wood, it will be satisfactory to know that there are such things as metal escutcheon plates. These have keyholes in them and they are not only useful for hiding badly cut holes in the wood, but they are ornamental in appearance. If the hole in the plate is not sufficiently large to pass the key, it is not a difficult matter to file it larger.
Many kinds of locks are sold with, and are only usable with, plates for the bolts to shoot into or catch in. The relative positions of the lock and plate are of importance, and must be adjusted
|
|
|
|
|
|
|
|
|
|
|
|
|
|
|
|
|
|
|
|
MAKING UP FRETWORK ARTICLES.
99
carefully to each other if trouble afterwards is to be avoided. The usual way is to fit the lock first and then adjust the plate to it. Another variety of lock is that in which the bolt shoots into an eye projecting from the plate and fitting into the lock. In this case the operation of fitting the plate is considerably simplified, as it is only necessary to fix the lock, put the plate on it when " unlocked," and put the lid down to ensure the exact position being marked. The plate is then to be sunk flush with the surface.
In another kind of lock for cupboard doors and for drawers a plain bolt is shot forward on the key being turned.
A few words on the construction of doors will not be out of place. It is seldom that a fretwork design shows that the door is to be framed and panelled, in most cases a plain piece of wood behind the fret, or the fret itself forming the door. This method may do occasionally for very small doors. In the majority of instances it will be better for the fret to be glued on to another piece of wood to form a backing to it. If the door is only small a plain piece of wood will do very well, and it may answer even for a large one, though in this latter case there is some risk of the wood not remaining flat. To avoid this as much as possible the grain of both the fret and the backing should be in the same direction. If one is horizontal and the other perpendicular, not only is there a great chance of the door twisting or curling, but of one or other of the pieces splitting. To make the job a perfect one from a joinery point of view the door ought to have a frame and panel fitted flush within it on the side to which the fret is applied. To make a door neatly in this way requires some good joinery, so that if the fretworker is not equal to the task he should get a cabinet-maker to do what is necessary for any article which is valued.
|
|
|
|
|
|
|
|
|
|
|