|
Fretwork
and marquetry, D. Denning |
Attention: Some browsers fail to show this page correctly.
Internet Explorer does it fine.
|
|
|
|
|
|
|
|
|
|
|
|
|
|
|
|
|
|
Making up Inlays and Marquetry.
|
|
|
|
|
|
|
|
A VERY ingenious way of fitting the various pieces which form an inlay has been devised. It consists of simply glueing the edges of a piece and putting it in its place. Nothing could seem easier, but unfortunately it is only a theoretical method . and cannot be worked in practice. If it could this chapter would only be a very short one, for no further directions than those indicated in the above lines could be necessary.
The inlaid veneers, being so thin, are in themselves useless till they are strengthened by being stuck to, or, to use the technical word, "laid " on, a foundation of solid wood. Now it may seem to many that the best and simplest way is to stick the various pieces forming the inlay direct on to the foundation. In some cases this way of proceeding may be possible, but it should not be practised unless there is some valid reason for not following the ordinary course.
In this, the inlay is made up on a piece of paper first and stuck down to it. Any kind will do, and old newspaper is generally used. The paper is glued over and laid on a flat surface, such as a table or bench. The principal piece of the veneer is put down on it, and the others in their proper order are added till all are stuck down, when the whole piece is put on one side till dry. The glue used should be of a kind that does not set or harden too quickly, otherwise the paper may get dry before all the pieces are stuck down to it. We prefer Le Page's liquid glue to any other for the purpose. If desired to retard its setting, a little treacle, sugar, or glycerine may be added, but not to a sufficient extent to unduly prolong the drying. With most glues a very small quantity will suffice. Instead of putting the glue on the paper, each piece of the inlay may have the glue applied to it just
|
|
|
|
|
|
|
|
|
|
|
|
|
|
|
|
|
|
|
|
134
FRETWORK AND MARQUETRY.
before it is laid, but this is not such a cleanly method as the other. However, it is just for the worker to decide which plan he will adopt, for as far as the inlay is concerned it matters very little how roughly the glue is laid on, so long as it or dirt does not soak into and spoil the colour of any light-coloured wood. The appearance of an inlaid piece of work at this stage is anything but beautiful and is apt to disappoint those who are not accustomed to seeing it till finished. If held up to the light even the joints, or many of them, will look very discouraging, for it will be a wonderful piece of work for any but a most accomplished cutter if they are so close as to be light-tight. Although those accustomed to see inlays in the rough, a condition in which they are seldom seen outside the workshop, could form a pretty accurate opinion of its quality, others cannot do so till the work is finished, when it will present a very different appearance.
If necessary to flatten the inlay, when it is made up and stuck on the paper it may be kept under a weight for a time, but some precautions must be taken, such as placing a sheet of paper between the board, or whatever is used, and the inlay to prevent them sticking if the glue has not quite set.
At this stage of the proceedings the inlayer's work may be said to have ended and that of the cabinet-maker to commence, for in practical workshops all subsequent operations are done by the latter. It may, however, be assumed that the amateur desires to finish his own work.
The inlaid veneers must be allowed to stand idle till the glue has thoroughly hardened, for otherwise there is a risk of displacing some of the pieces. When the veneer is ready, the upper surface, that is, the one uncovered with paper, must be levelled and roughened. This may best be done with a toothing plane, the iron of which is upright in the stock and toothed or notched at the edge, something after the style of a saw. Its action is a scraping one, and the iron should be set so that too much of the surface to which it is applied is not removed, for an inlay veneer will not stand rough usage. The toothing plane is moved in all directions over the wood, levelling those portions which may have been higher than others, and leaving a suitable rough surface for the glue to hold on. In the absence of a toothing plane, a coarse file or glass-paper may be used, but they are neither so quick nor so satisfactory. When this has been done, the veneer is ready for laying on its foundation. It should be good sound stuff without cracks or knots, and when the veneer is down on it, it
|
|
|
|
|
|
|
|
|
|
|
|
|
|
|
|
|
|
|
|
MAKING UP INLAYS AND MARQUETRY.
135
should be treated as any other solid piece of wood. The surface on which the veneer is to be laid should be planed level and gone over with the toothing plane or roughened, so that the glue may hold well. In selecting a piece of wood for the foundation, care should be taken that the grain of the wood and of the main portion of the inlay are in the same direction, and not across each other. For very small work this may not be of much consequence. Inlays are treated just as plain wood would be, the rules in one case applying equally to the other, but it must be noticed that inlays should be laid with the caul. To those who are acquainted with veneering processes, the reason for the former being inapplicable will be at once recognised, and nothing need be said about the preference for the caul. As this method was touched on in a former chapter, the following remarks must be regarded as supplementary. The caul may be of the ordinary common wooden kind or of metal. The cauls for laying the inlay are simply two pieces of board of any kind, pine being as good as any, of, say, an inch in thickness and not smaller than the inlay or its foundation which are laid between them. The glue used should be of good quality, and applied hot and not too thick to the board to which the veneer is to be laid. The cauls should in the meantime be heated at a fire to be in readiness by the time the veneer is put on the glued foundation. The veneer wood is then put between the two cauls, and pressure by means of hand-screws or other appliance is brought to bear on them. The heated cauls soften the glue, so that excess is squeezed out from between the veneer and its foundation, as well as any air bubbles, which, if allowed to remain, would prevent adherence and cause what are known as blisters on the veneer. The pressure must be maintained till the glue has set. The veneer is laid with the paper uppermost. As some of the glue may exude through the joints of the inlay and cause this paper to stick to the caul, it is as well to avoid any risk of this occurring by putting a loose piece of oiled paper between the veneer and the caul above it. This can never do any harm. After the veneered wood has been removed from the caul it should be allowed to stand for a day or two untouched before cleaning off the paper and otherwise finishing, in order that the glue may become thoroughly hardened. The reason that the veneered wood should be allowed to stand for a time is that if cleaned and finished off at once the heat caused by scraping and glass-papering may be sufficient to cause the glue, if it has not become quite hard, to soften to such an
|
|
|
|
|
|
|
|
|
|
|
|
|
|
|
|
|
|
|
|
136
FRETWORK AND MARQUETRY.
extent that the veneer will rise in places and blisters be formed. Another important consideration is that the glue, still Soft, between the joints of the inlay will sink and leave the joints more open than they would otherwise seem to be if the glue filled them. The time that should elapse between laying the veneer and cleaning it off must depend on circumstances, but should scarcely be less than a day or two, and no harm will result if it is considerably longer. In fact, the cleaning up may be deferred for any length of time. When ready, the paper is removed by scraping or with the toothing plane. After it is off, the inlay is seen in better condition than it has been yet. The scraper and sand-paper will be used till it is perfectly smooth and clean, and as the veneer is only thin, it will not stand an excessive amount of scraping or rubbing down with paper. After having been cleaned, blisters must be carefully searched for. They may be apparent both to sight and touch, but they can generally be detected by tapping the surface all over with the handle of a hammer or other tool. If there are blisters, no pains should be spared to lay them, i.e., to stick the veneer down at such parts. Blisters arise mainly from two causes, viz., either air between the materials, or from the glue having been pressed away at such parts to such an extent that there is not sufficient to cause the veneer to adhere. In the former case, the air may be allowed to escape by pricking the blister. This is then pressed down by a heated hammer head, or other piece of iron, which acts as a small caul, and melts the glue underneath sufficiently to cause adherence. If the glue has become quite hard and parted with all its moisture it will not. become adhesive. In this case it must be damped by a little water pricked through the veneer, or it may be possible to make a cut in this, so that a little water can be put through the cut. If the glue has perished, the only way is to cut and raise a small portion of the veneer so that fresh glue may be inserted. From the trouble involved in laying blisters, it will be seen that it is better to avoid all chance of them occurring by exercising care beforehand.
If the inlay has been well cut and all the parts fit closely together it may be considered as finished. But it is very probable that some of the joints are open, and even that some small parts may be missing altogether, and will require filling up. Any unusually wide spaces should have been filled up when the veneer was laid on the paper, but the course of procedure is the same, and the explanation has been purposely deferred till now in order that
|
|
|
|
|
|
|
|
|
|
|
|
|
|
|
|
|
|
|
|
MAKING UP INLAYS AND MARQUETRY. 137
the whole of the work may be gone over in an intelligent manner. Before, it might have been probable that the novice would have overlooked the important part that the glue plays in filling up joints.
One favourite method of stopping or filling such places is to use a mixture of white glue and saw-dust of the colour required, and for general purposes it is a very good one. The mixture, which should be composed principally of the saw-dust with only sufficient glue to make it stick together, is rubbed into the places to be filled. It should be left for a time for the glue to dry, and in doing so it will shrink, so that if levelled off at once it will be below the surface of the work.
Another kind of stopping, of special use to fill up the place of missing bits of the inlay, is a kind of sealing-wax, which can be brought in various colours. It is, however, easily prepared. A very small quantity will suffice. The best stopping is made by melting shellac, and mixing appropriate colours with it, the colour depending on that of the wood in lieu of which the stopping is to be used. The shellac stopping before it cools should be worked into sticks, similarly to sealing wax, as in this form it is more conveniently used than in irregular lumps. A good stopping for ordinary purposes, and one very commonly used, is made with shellac, or resin for cheapness, and a small quantity of beeswax melted with it. The proportions vary, and are always mixed by rule of thumb. The mixture is coloured as before indicated.
To use these stoppings, a small quantity is melted into the places required with a piece of heated iron and is as hard as it will be as soon as it has become cold. Wax alone is sometimes used as a stopping, but it cannot be recommended on account of its softness.
Although glue does very well to lay veneers of wood with, it is not satisfactory with metals or with xylonite, as it does not stick properly to them. If the pieces of metal, etc., are only small and fit tightly, nothing more may be necessary, but if they form the entire inlay, or any considerable portion of it, they require special treatment.
Metal should be quite free from grease, and as it is generally used only in small quantities, Le Page's glue seems to do very well for laying inlays of which the bulk is wood. Ordinary glue may be rendered useful for the purpose by mixing some powdered resin thoroughly with it. In special cases it may be necessary to raise the metal and lay it gradually with the melted shellac.
Xylonite requires an altogether different treatment, for glue does not answer so well for fastening down permanently as the
|
|
|
|
|
|
|
|
|
|
|
|
|
|
|
|
|
|
|
|
138
FRETWORK AND MARQUETRY.
special xylonite cement, though often used. It should be brushed thinly on the xylonite. The wood may be either thinly-coated with the same and the two surfaces brought together before the cement has set, which, owing to evaporation of the solvent, it soon does, or with glue. When properly done, the firmest join is made by the former method, but the latter is quite sufficient for all ordinary purposes, and is the only one which is practically available when the inlay is partly of xylonite and partly of wood, for though we have used xylonite cement with wood instead of glue, we are unable to state whether it will be permanently satisfactory.
It is not, however, used, so far as we know, to any extent by marquetry-cutters, possibly only because they are not acquainted with it, and our own use of it has not been sufficiently extensive to warrant our unreservedly recommending it in lieu of or as a substitute for glue. Hot cauls are used with the cement as with glue. Many marquetry-cutters use only glue even with their ivorine (xylonite) inlays, but we do not consider this satisfactory as the adherence of glue when dry to this material is anything but firm. While speaking of xylonite cement it may be well to say that when coloured with shavings or sawdust of xylonite it forms the best stopping for this material. It must, however, be used with care and not be worked over the surface more than can be helped. As it shrinks considerably in drying, it may be necessary to make two or three applications to those places which are to be stopped.
In order to show their beauty fully and to make them appear to the best advantage semi-transparent substances, such as tortoise-shell or imitations thereof, should be laid on a white foundation, or at least on one of a light colour. As it is not always convenient to use a white wood for this part of the work, some other means of doing what is necessary must be resorted to.
White glue may be mixed with plaster of paris, powdered chalk, or whiting till it is sufficiently opaque to disguise the natural colour of the wood, or the surface of the wood may be whitened by chalking it over before applying the glue. When the bulk of the veneer is transparent, this method may often be adopted with advantage. An alternative is to glue a piece of white paper or calico between the inlay and the foundation. It is of little or no consequence whether the whole of the ground under the opaque portions of the inlay be white or not, but when only small pieces are to have a white backing it is often more convenient to apply this locally than to be at the trouble of whitening the whole of
|
|
|
|
|
|
|
|
|
|
|
|
|
|
|
|
|
|
|
|
MAKING UP INLAYS AND MARQUETRY.
139
the surface of the ground on which the veneer is laid. The easiest way in such cases is to glue or cement white paper or calico direct on to the pieces of inlay which is to be backed with white. If it encroaches on other pieces it will do no harm, so that great accuracy in cutting the paper is not requisite.
It may occasionally happen that a piece of veneer has to be laid on a curved ground, and it would hardly do to allow the novice to remain in ignorance of the plan to be adopted, although we certainly advise him in such a case to secure the services of a skilled cabinet-maker accustomed to such work in preference to attempting it himself. A caul may either be made to fit the curve of the panel to be veneered—but unless a considerable number have to be done this is generally too troublesome—or a bag may be made large enough to go over the work and filled with sand. This makes a flexible caul which adapts itself accurately to the curves of the panel, and is used hot as if it were wood. To tighten or press it against the work, pieces of wood may be placed on the outside and then be tightly bound round with cord or webbing. As the circumstances under which the caul is used are constantly varying, it is impossible to do more than give general directions, but remembering what the caul is for, a little ingenuity will enable most of the difficulties which may be encountered to be overcome.
Xylonite veneers present little difficulty even when adapted to curved surfaces, as they can be bent approximately to shape by heating them prior to laying.
|
|
|
|
|
|
|
|
|
|
|
|
|
|
|
|
|
|
|
|
|
|
|
|
|
|
|
|
Shading Inlays, Making and Laying Stringings.
|
|
|
|
|
|
|
|
THE important part played by shading and the way it is done have yet to be mentioned. Although many inlays are finished without any parts being shaded, when judiciously done shading much increases the artistic quality of the work. A rich appearance which is wanting in unshaded inlay is given to it, but more time and care are wanted to enable the highest effects to be achieved. Even with ordinary fretwork designs, when judiciously done very fine results may be accomplished, and that,
|
|
|
|
|
|
|
|
|
|
|
|
|
|
|
|
|
|
|
|
|
|
|
|
too, without the use of more than two colours, one for the ground and the other for the inlay.
In order to illustrate this we take an ordinary simple piece of fret design and show how a really beautiful piece of inlay may be elaborated from it. If the reader derives the benefit we hope he will from these suggestions, they will enable him to overcome the
|
|
|
|
|
|
|
|
|
|
|
|
|
|
|
|
|
|
|
|
SHADING INLAYS, MAKING AND LAYING STRINGINGS. 141
difficulty so often felt of getting more than a limited number of designs specially for inlaying. There are a good many of these, but nothing like the number for ordinary fretwork, so that in making the present remarks we are really showing how almost any of these may be treated for inlaying purposes, whether plain or in several colours.
The German and Italian designs which have been referred to elsewhere are adapted for use by the inlayer. The former are generally preferable when bold, strong effects are wanted, while
|
|
|
|
|
|
|
|
|
|
|
|
|
|
|
|
Fig. 55. Portion of Design for Inlaying.
|
|
|
|
|
|
|
|
many of the latter are of extreme delicacy. We refer, of course, particularly to the ordinary fretwork designs which are not specially named as being prepared for the inlayer's use, our wish being to show how they may be developed.
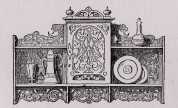
Our specimen, fig. 54, is taken from a fret workdesign published by Messrs. H. Zilles and Company, in whose catalogue it is numbered 704-706. The article from which the portion on which our remarks are founded consists of a wall cabinet.
|
|
|
|
|
|
|
|
|
|
|
|
|
|
|
|
|
|
|
|
|
|
142
FRETWORK AND MARQUETRY.
|
|
|
|
|
|
|
|
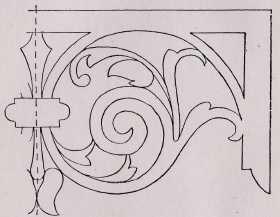
The particular piece of fret chosen as our text is the bottom centre one, immediately under the cupboard portion. Reduced in size and to bare outline, little more than the half being shown, as no more is necessary to explain our meaning, it is as represented
|
|
|
|
|
|
|
|
|
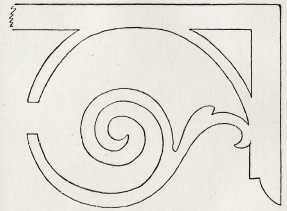
in fig. 54. As a fret it looks very well and is equally suitable for a plain inlay of one colour for the ground and another for the pattern. Let us see how it will work out. if more colours are wanted. This can be managed by keeping what may be regarded as the main scroll the same as the top and end margin of one colour, so that the stencilled outline for it
will be as shown in
|
|
|
|
Fig. 56. Portion of Design for Inlaying.
|
|
|
|
|
|
|
|
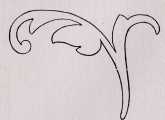
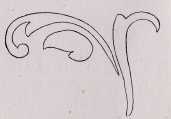
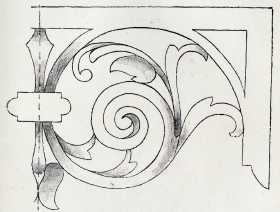
fig. 55. Another piece will be recognised in fig. 50, and if desired the portions of it may be further subdivided, as shown in fig. 57. The small conventional leaves springing from the upper edge of the bottom of the scroll are shown in figs. 57 and 58. The centre piece connecting the scrolls, fig. 59, may very appropriately form another separate piece, and the same may be said of those
|
|
|
|
|
|
|
|
portions above and below it, the latter terminating in a kind of conventional flower. These will readily be recognised in figs. 55 to 62. The whole of these put together will make up an inlay of ten parts for the half-design, without counting in the ground pieces, as shown in fig. 63, where the joints can be clearly discerned. In judiciously assorted tints or colours it will be seen
|
|
|
|
|
Fig. 57. Portion of Design for Inlaying.
|
|
|
|
|
|
|
|
that a handsome piece of inlaid work has been evolved from the comparatively crude plain fret design. Still all the colours are flat,
|
|
|
|
|
|
|
|
|
|
|
|
|
|
|
|
|
|
|
|
|
|
|
|
|
SHADING INLAYS, MAKING AND LAYING STRINGINGS. 143
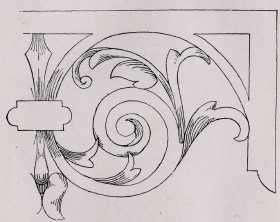
and it can be still further improved by shading the pieces, as suggested in fig. 64, p. 145. The darkest portion of each shaded part, it will be noted, terminates in a joint. Such shaded work need not be in colours, for very fine effects can be got by simply shading
|
|
|
|
|
|
|
|
|
pieces formed all of one kind of wood. For this none is better than box, though all light sorts may be treated in this manner. The shading is lost on a dark wood.
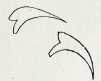
Shading may be done in two ways. In the kind represented in fig. 64 it is gradual and is done by means of hot sand. In the other, as in fig. 65, where it will be noticed additional pieces have been made and the tips of the leaves
|
|
|
|
Fig. 58. Leaves of Scroll.
|
|
|
|
|
|
|
|
slightly altered, it is done by means of engraved lines, as shown. For ordinary wood inlays the former is generally used, while the latter method is employed for ivory and metals, as well
as occasionally on wood.
The hot sand method, as being of the widest application and the most suitable for the inlayer, will first be described. Any kind of sand will do for the purpose. It should be heated over a fire or gas stove, and be kept while in use on a tray or metal dish of some kind. The object is to get the sand so hot that it will brown
|
|
|
|
|
|
|
|
or darken a piece of veneer stuck into it but not hot enough to burn or char the wood. Thus, on a light wood absolute black cannot be got and is not wanted. The pieces to be shaded are to be stuck into the sand with the edges to be darkened downwards, and must be withdrawn occasionally in order that the progress of the shading may be noted.
|
|
|
|
|
|
|
|
|
|
|
|
|
|
|
|
|
|
|
|
|
|
|
|
|
|
|
|
In fact, it may be said that they should never be left alone, but be constantly withdrawn and reinserted to get a finely graduated browning.
Care is necessary not only to get the shading well graduated but to get all the pieces to the same tone. A pair of pliers or
|
|
|
|
|
|
|
|
|
|
|
|
|
|
|
|
|
|
|
|
|
|
|
144
FRETWORK AND MARQUETRY.
|
|
|
|
|
|
|
|
tweezers will be useful to save the fingers when shading small pieces. When the heat of the sand can be accurately gauged the pieces may be stuck in and left till the sand gets cold, but we do not recommend this method for fine work, nor yet as suitable for the beginner. The pieces must be shaded before the inlay is made up, for it cannot be done afterwards, though a very close imitation may then be done by using transparent water colours or stains. Indian ink with a brown tinge given to it by Vandyke
|
|
|
|
|
|
|
|
|
|
|
|
|
|
|
|
Fig. 63. Pieces Made Up in Unshaded Inlay.
|
|
|
|
|
|
|
|
brown or other suitable colour is very useful, and defective sand shading may often be improved in this manner. An ordinary camel-hair paint brush is used to apply the colour with. Plain white inlays may be tinted in imitation of coloured work, but the objection to this is that the colours, as they do not sink deeply, are apt to be rubbed or scraped away when cleaning up the work. Anything that is intended to be painted, either wholly or for shading, should be finished, so far as scraping and rubbing smooth with sand-paper, before using the brush. If the water causes the
|
|
|
|
|
|
|
|
|
|
|
|
|
|
|
|
|
|
|
|
SHADING INLAYS, MAKING AND LAYING STRINGINGS. 145
grain to rise it may be gently smoothed down with the finest glass-paper. The brush should be kept as dry as it well can be and not be over-charged with water.
The other method of shading, viz., by engraved and blackened lines, is more work for the engraver than for the inlayer, who will probably spoil the inlay. Unless the lines are clearly and regularly cut they will do anything but improve the work. The lines are formed with the ordinary graver used by wood engravers. As wood
|
|
|
|
|
|
|
|
|
|
|
|
|
|
|
|
Fig. 64. Inlay Shaded with Hot Sand.
|
|
|
|
|
|
|
|
engraving is beyond our province, it must suffice to recommend those who are desirous of doing this part of the work themselves to refer either to a practical manual on wood and metal engraving or to take a lesson or two from some engraver. Before the engraver touches the inlay it should be laid and cleaned up as far as it can be, that is, finished all except the final polishing. Many methods have been advocated for blacking the engraved lines, but none is better for general purposes than that of rubbing heel-ball on. Any that adheres to the surface of the work can be
K
|
|
|
|
|
|
|
|
|
|
|
|
|
|
|
|
|
|
|
|
146
FRETWORK AND MARQUETRY.
|
|
|
|
|
|
|
|
removed by glass-papering, leaving the black lines clear and sharp. Xylonite cannot be shaded by hot sand.
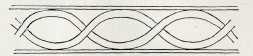
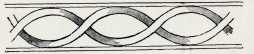
By the judicious use of shading many excellent effects may be got on designs which are otherwise unimportant, as, for example, figs. 66 and 67, which represent very simple lines, both plain and shaded for purposes of comparison ; either is very suitable for a border. In concluding this part of our directions we would recommend the
|
|
|
|
|
|
|
|
|
|
|
|
|
|
|
|
Fig. 65. Inlay Shaded with Engraved Lines.
|
|
|
|
|
|
|
|
would-be inlayer to remember that after the mechanical difficulties have been overcome, excellence can only be obtained by study and the application of artistic faculties. Inlaying is as much an art as music or painting, so that instructions cannot take the student further than a certain point.
There is, however, a branch of the work which must not be overlooked. We refer to the stringings or bandings which are often found round or near the edges of panels, the centres of which are inlaid with marquetry or are even left plain, as in the
|
|
|
|
|
|
|
|
|
|
|
|
|
|
|
|
|
|
|
|
SHADING INLAYS, MAKING AND LAYING STRINGINGS. 147
case of table tops, drawer fronts, etc. The stringings or bandings are plain in the majority of good work, the bandings of mosaic inlays being left for small fancy knick-knacks of a cheaper kind. Stringings, however, are very effective when judiciously introduced and not overdone. They are simply straight pieces of veneers, and- to be obtained ready made in various widths. All that is necessary is to cut off the lengths either with a sharp tool or
|
|
|
|
|
|
|
|
|
|
|
|
|
|
|
|
Fig. 66. Unshaded Inlaid Border.
|
|
|
|
|
|
|
|
knife guided by a straight edge, or to use the ordinary cutting gauge to do so. When several lengths of precisely the same width are wanted the latter is the better way, especially if the pieces are of a fair width. If very narrow the former way of cutting them, will be found easier. They may be let into the wood afterwards. To do this spaces or hollows must be cut to receive them, and the fretsaw is of no use for the purpose. The easiest way, and one as satisfactorily as any, is to cut them with the scratch or router. A cutter with a square end and of suitable width must be used, or if a very wide banding is to be let in, one wider than can be readily scratched, it may be more convenient to use the cutting
|
|
|
|
|
|
|
|
|
|
|
|
|
|
|
|
Fig. 67. Shaded Inlaid
BordEr.
|
|
|
|
|
|
|
|
gauge to cut down on each side of the intending banding and to remove the wood between them to the required depth with a chisel. The banding is then to be glued down in its place. Instead of using just one width of stringing, a more finished effect may often be given by using a comparatively wide piece in the centre, and on each side of it one or two thinner pieces. The number of combinations of this kind is practically endless.
k
2
|
|
|
|
|
|
|
|
|
|
|
|
|
|
|
|
|
|
|
|
148
FRETWORK AND MARQUETRY.
It is sometimes necessary to lay marquetry in solid wood. In this case the pieces to be let in are sawn as usual, but the spaces for their reception must be cut or incised as in carving, in fact they may be considered as carved incised lines filled up with coloured veneers, and among professionals the work is the joint production of the carver and of the marquetry-cutter.
In our next and concluding chapter will be found a description of a marquetry-cutter's donkey, together with hints how to use it.
|
|
|
|
|
|
|
|
|
|
|
|
|
|
|
|
|
|
|
|
|
|
|
|
|
|
|
|
The marquetry-cutter's Donkey : How to Make and How
to Use It.
|
|
|
|
|
|
|
|
THE donkey, in common with all tools and workshop appliances which are made by the user, is found in many different shapes and styles. This is natural, as each worker has his own ideas of what is best and most convenient, and being entirely made of wood there is no necessity for his not indulging in them. To whatever extent the details of shape and construction vary, the main features remain the same, and it may be useful now to describe what these are in order that the more minute directions which follow may be appreciated and, if considered desirable, altered to suit the user.
The donkey may be described as a seat with a pair of upright jaws forming a vice, within which veneers are held while they are being sawn. As it is necessary that this vice should be instant in action, both in closing and opening, one or other of the aws must be made so that it springs open or remains so when not in use, and can be closed by means of a string connected with a pedal, on which one of the worker's feet press. By releasing the pressure, the jaws open sufficiently to allow the veneers being cut to be turned round. Perhaps a better idea of the action will be conveyed by saying that the jaws are kept so close that the veneers cannot easily be broken by the saw, being kept rigid, but that they are not so tightly closed as to prevent the material being worked on from being moved to the blade.
The height of the seat is generally about that of an ordinary chair. The length is that which will enable the worker to sit at or towards one end of the seat, and be able to hold the wood being cut in his left hand, and to work the saw with his right A convenient length is 2ft. to 2ft. 6in. The height from the seat to the top of the jaws is that at which the saw can be most conveniently worked, and may be named as about lft. 3in. to lft. 8in.
|
|
|
|
|
|
|
|
|
|
|
|
|
|
|
|
|
|
|
|
150
FRETWORK AND MARQUETRY.
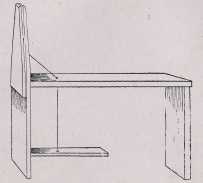
The simplest form of donkey that can be made is shown in fig. 68. A high degree of finish or nice joinery will not in the smallest degree enhance its value from a practical point of view Although the dimensions of the various parts are named, they need not be closely adhered to, so that any odd bits of timber which are anything near the sizes named may be made available
The seat itself is, say, 2ft. 3in. long, of l 1/2in. stuff, and of any width which the sawyer can sit astride. At the back it is nailed to
|
|
|
|
|
|
|
|
|
|
|
|
|
|
|
|
Fig. 68. The Marquetry-Cutter's Donkey.
|
|
|
|
|
|
|
|
another similar piece, which acts as the leg there. The front leg is fixed on to the other end of the seat, and its upper end forms the back jaw of the vice. Even if wider at the bottom it should not be wider than 3in. at the top, and it may be considerably less. If necessary, it can be tapered straight from the level of the seat. It, as well as the other jaw, should be rounded off at the top or if not rounded the top edge should not be more than 1/4in. thick Anywhere on the front of the long leg a block of wood of about 1/2in. thick is fastened on, and in the absence of reason for placing it elsewhere it may as well be near the seat, as shown in the illustration of the donkey. This piece of wood
gives the distance
at which the jaws will be apart from each other when they are
|
|
|
|
|
|
|
|
|
|
|
|
|
|
|
|
|
|
|
|
THE MARQUETRY-CUTTER'S DONKEY.
151
open. On the front of it, again, the other jaw is nailed or otherwise fastened, and the donkey may be considered as made with the exception of the treadle and fittings to close the jaws. Before saying anything in connection with this movement, a few remarks about the piece forming the front one are necessary, as a little more care with regard to it is required than for the other portions. Pine or any other kind of wood will do for them, and might do for it also. It will, however, be well to choose a nice clean piece free from knots or shakes, and preferably of a tough kind, as it must have a certain amount of spring to open again after being released. In order that the resistance may not be excessive when bringing the jaws together, the front one should not be too thick to bend readily on pressure being applied with the foot. The exact thickness cannot be stated, as so much depends on the kind of wood, but it may be about Jin. to Jin. The strength of the spring, if too great, can easily be diminished by making a few saw-cuts across partly through the wood or by hollowing a groove across. By this means the degree of spring can be regulated to a nicety to suit the worker.
Now, to set the donkey in working order a piece of wood to act as a treadle is hinged on to the hinder side of the front leg, two or three inches above the floor.
To this, generally through a hole, a piece of string is fastened. This string passes through holes in the seat and both jaws and is secured by a knot in front—the string, which should be strong, being regulated to such a length that when the jaws are open the loose end of the treadle is a few inches from the floor. Only a slight pressure with the foot is necessary to depress the treadle, and in doing so close the jaws, which will hold anything placed between sufficiently firmly to allow of its being sawn. If necessary the seat and legs can be rendered more rigid than they may be if simply nailed together, by fastening stays or struts between them. Simple and roughly made as it is, the donkey described is a thoroughly practical, useful article, and anyone who could not do marquetry-cutting with its aid could not do so with one of more elaborate construction. The chief advantages of such a donkey are that it is simple and easily made, extremely light, and portable, in fact, the smallest that can be made, and the cost is merely nominal. On the other hand, there are disadvantages, or what may be considered such, for whether they are or not
depends a good deal on circumstances. The possible disadvantages are : unsteadiness if the seat and supports are very narrow, no table
|
|
|
|
|
|
|
|
|
|
|
|
|
|
|
|
|
|
|
|
152
FRETWORK AND MARQUETRY.
part or bench on which the pieces can be laid down as they are cut, and that the size of the work held in the jaws is limited by the position of the string. The first one may be overcome by widening the legs at the bottom by glueing a piece on to each side, and tapering it upwards towards the seat. The absence of any convenience on the donkey itself for holding pieces on merely necessitates having a table or a chair near the worker, and it is not likely that any piece of work will be done requiring greater space than can be got above the string.
A few suggestions for making another donkey will not be amiss for the benefit of those who want a superior and more convenient one, though, as has been stated, it will not be more conducive to better work.
If space is wanted to serve as a table on the donkey itself, the seat portion instead of being a plain piece of straight plank must be jointed up to get the necessary width. This may be anything, but unless the donkey is to remain in one place it should not be so great as to be unwieldy, and more than 2ft. may be regarded as superfluous. The chief extra space which will be available as a table will be in front of the jaws, and it may be convenient to put a rim round the edge there, to prevent things falling off.
At the back the board should be narrowed to form a convenient seat, and the leg or support there may either be as before, or of a more ornamental shape.
The front leg, or legs, if two are preferred in front, will in a donkey of this size be independent of the jaws, which will be fixed by mortising and tenoning into the top at a convenient distance from the worker, as before described. It may also be a convenience to have them a little towards the right hand instead of in the centre, in order that the sawyer may not be cramped in his movements when working. Instead of the string going through the jaws and the front one of these being the movable one, a different plan is adopted. The string simply moves in a direct line, and, as before, is fastened to the piece of wood for the foot at the bottom. At the upper end, however, it is fastened to a piece of wood, the bottom of which is hinged to the seat, the top resting against the hinder jaw. On depressing the treadle the upper end of this sloping piece is forced against the jaw, causing it to close up against the front one. Jaws made in this way will take work in as far as the seat.
Mention was made in a former chapter on the utility of sawdust for stopping purposes. In order that enough may be easily
|
|
|
|
|
|
|
|
|
|
|
|
|
|
|
|
|
|
|
|
THE MARQUETRY-CUTTER'S DONKEY. 153
secured and saved, many marquetry-cutters have a small tin trough fixed near the top of the front jaw; the sawdust collects in this as it falls. A similar convenience will be found in having a V-shaped notch in the top of the jaws.
Now, in using the donkey it will be seen that as the wood is held perpendicularly the blade cuts horizontally, and those who have learnt to do ordinary fretwork with the positions of the wood and of the saw reversed will find the action very irksome. This awkwardness, however, will soon wear off, and the advantage of being able to saw without stooping over the work will be appreciated. A minor advantage is that sawdust does not collect nor require to be blown away from the surface, as it falls directly it is made. The saw may be used to cut downwards or in any direction from the right, as the jaws will allow. The blade of the saw may be fixed either to face to the left of the frame or to the front, as under ordinary circumstances.
Now, for those who do not care to use a donkey, either from an objection to learn the altered style of sawing, or from want of space, we have devised a kind of cross between it and the ordinary cutting-board. Like the former, this appliance holds the veneers, and like the latter, it can be fastened to an ordinary table-top. It simply consists of a double cutting-board, the lower one a few inches longer than usual if anything but very small work is to be done, and the other fastened on to it with a piece of wood between, as directed for the donkey. A piece of string fastened to the upper or spring board is conducted through a hole in the other, taking care that it clears the edge of the table to near the floor, where it ends in a loop for the worker's foot.
All that it is essential for the worker with the fretsaw to know, both in cutting and making up work, has now been told, and in taking leave of our readers who have followed the course of instructions, we wish them hearty success in their efforts to put them to practical use.
|
|
|
|
|
|
|
|
|
|
|