|
Sorrento
and Inlaid work, Hope |
Attention: Some browsers fail to show this page correctly.
Internet Explorer does it fine.
|
Go to
pages:
|
0 -
40 |
41- 63 (plates) |
|
|
|
|
|
|
|
|
|
|
|
|
|
|
|
|
|
|
|
|
|
|
|
|
|
|
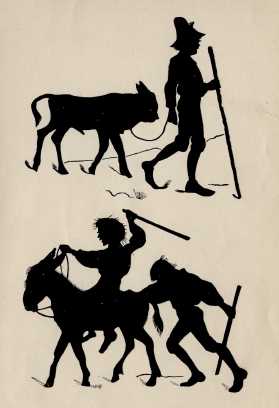
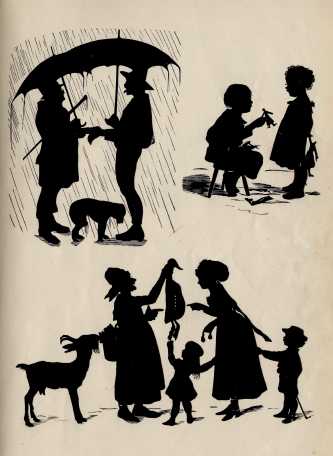
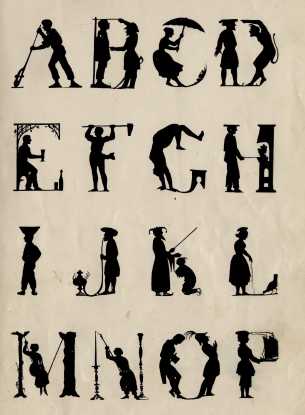
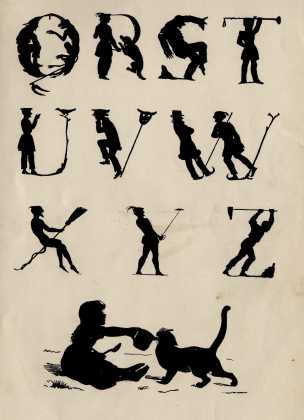
THERE are few articles made with the scroll-saw prettier or more ornamental than silhouettes. Sheets of these designs are generally for sale at book stores and by dealers in sawing materials, and cost from fifteen to twenty-five cents per sheet. Many beautiful designs can also be found in books illustrated by Konewka and other artists, and frequently in books for children. The following design will serve for an example:
|
|
|
|
|
|
|
|
|
|
|
|
|
|
|
|
|
|
|
|
|
|
|
|
|
|
|
|
|
|
|
|
|
|
|
|
|
|
SORRENTO AND INLAID WORK.
|
|
|
|
|
|
|
|
This can be cut from ebony, either one-sixteenth of an inch thick, or any other close grained wood of that thickness, or from veneers. The various colors of dyed veneers will be found very useful for making silhouettes. The wood must be made perfectly smooth before tracing the pattern. It is essential in this class of work, as well as for inlaying, to use only the finest quality of saw blades, those with perfect and regular teeth. A No. 0 or 1 blade should be used, except for the most delicate parts, such as the lips, hair, eyelashes, etc., which require a No. 000. Where veneers are used, they should be held or glued
between two thicker woods to prevent their breaking.
Silhouettes are used in a variety of ways; either by overlaying on a sheet of polished wood, or by mounting them on a
piece of moulding, with a slit sawed in it lengthwise.
If the amateur has a first-class treadle machine, he can easily decorate the walls of a room by applying silhouettes in the following manner: Procure a quantity of some cheap veneer, such as walnut or holly or rosewood, and cut into strips about six inches wide, and square at the ends. Sandpaper them smooth, and finish with shellac or polish. Then select a number of designs, the more the better, and saw half-a-dozen or more of each. Glue these, at regular intervals, and on a line, to the strips of veneer. These can then be tacked to the wall, all the way around the room, a few inches below the ceiling. By a tasteful selection of designs, and careful fitting of the strips,
one can in this way beautify his home at a trifling expense.
|
|
|
|
|
|
|
|
|
|
|
|
|
|
|
|
|
|
|
|
|
|
|
|
|
|
|
|
|
|
|
|
|
|
|
|
|
|
|
The following is an ingenious way for cutting silhouette likenesses of children and others for overlaying. With a strong light throw the shadow of the child's head (in profile) on a sheet of paper tacked against the wall. Quickly trace the features, shape of head, etc., with a pencil. A little practice will enable any one to make admirable likenesses in this way. Then, with a pentagraph — an instrument for reducing or enlarging drawings, for sale generally wherever artists' materials are kept, from one dollar up — make a reduced sketch of the head, as small as desired. This can then be applied to the wood, and cut out in silhouette as before described. In this simple way any one can decorate an easel or bracket, or any other article of fretwork, with an accurate profile likeness of some friend.
|
|
|
|
|
|
|
|
|
|
|
|
|
|
|
|
|
|
|
|
|
|
|
|
|
|
|
|
|
|
|
|
|
|
|
|
|
|
|
|
|
|
|
|
|
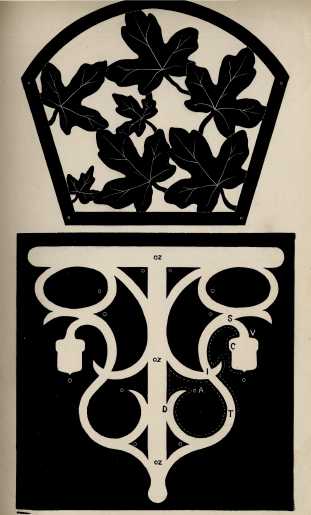
figure 1. Design for bracket, fully described in Chapter V. Figure 2. Design for card basket. This can be made from one-sixteenth holly, satin or walnut, or from one-eighth wood. If of holly or other light-colored wood, the veins in the leaves can be traced with a fine pen in India ink; also the edges of the leaves, where they overlap each other or the border of design. For a square card basket, cut out four sides, and a base two and three-fourths inches square; drill holes where marked, and tie the whole
together with silk thread or narrow ribbon.
|
|
|
|
|
|
|
|
|
|
|
|
|
|
|
|
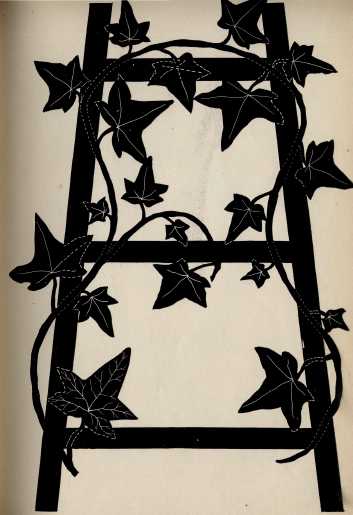
Design for an easel as described in Chapter VI.
|
|
|
|
|
|
|
|
|
|
|
|
|
|
|
|
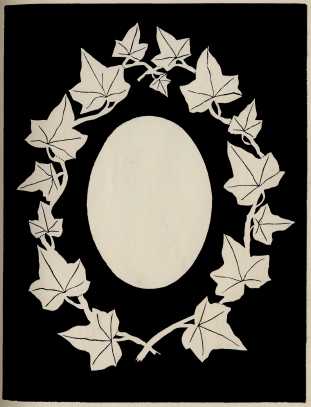
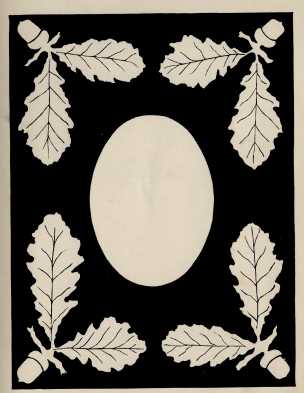
Design for a card picture frame. The ivy-leaf can be either
44
|
|
|
|
|
|
|
|
|
|
|
|
|
|
|
|
|
|
|
|
|
|
|
|
|
|
|
|
|
|
overlaid or inlaid. For overlaying, use either veneers or one-sixteenth woods.
|
|
|
|
|
|
|
|
|
|
|
|
|
|
|
|
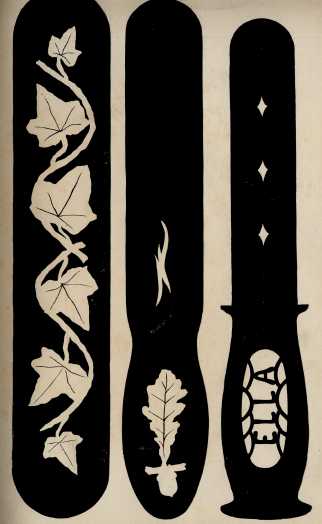
Three designs for paper-knives; two for inlaying and one for open work. Any other letters can easily be substituted for those
in pattern.
|
|
|
|
|
|
|
|
|
|
|
|
|
|
|
|
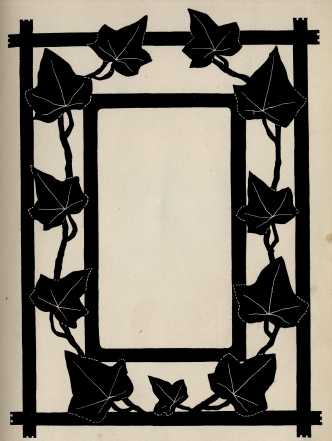
Design for a card picture frame, either for inlaying or overlaying.
|
|
|
|
|
|
|
|
|
|
|
|
|
|
|
|
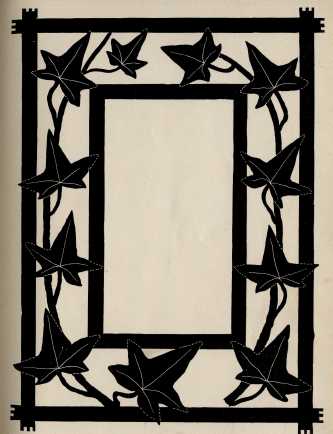
Design for a card picture frame. The back, to hold the picture can be made as described in Chapter X, and the veins in leaves
either traced in India ink or cut with saw.
|
|
|
|
|
|
|
|
|
|
|
|
|
|
|
|
Design for end of bookstand. Cut from polished wood, either one-eighth or three-sixteenths of an inch thick. Make two of them. Then take two pieces of one-quarter or three-eighths wood, the upper one four and five-eighths, and lower one five and a half inches wide, and as long as desired. Fasten the ends of bookstand to these with round-headed screws. Ordinary countersunk screws
should not be used, as they might split the wood in driving tight.
|
|
|
|
|
|
|
|
|
|
|
|
|
|
|
|
|
|
|
|
|
|
|
SORRENTO AND INLAID WORK.
|
|
|
|
|
|
|
|
If the above pieces of wood are cut thirteen inches long the bookstand will be just the right size to hold the sixteen volumes of the "Little Classics." A small silhouette should be glued to the center of the shield before the stand is put together. A bookstand made in this style will be found very convenient, as the top makes a nice shelf for standing various articles.
|
|
|
|
|
|
|
|
|
|
|
|
|
|
|
|
Design for a card picture frame, similar to Plate VI, but with a different style of ivy-leaf.
|
|
|
|
|
|
|
|
|
|
|
|
|
|
|
|
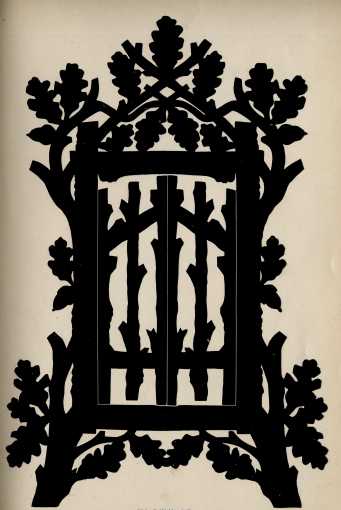
Design for a shrine card frame. This can be cut from one-sixteenth or one-eighth wood. The two doors or gates are to be fastened on with hinges. For this rustic and pretty pattern the author is indebted to Mr. Chris. Arnold, of Chicago, a designer and scroll sawyer of considerable merit.
|
|
|
|
|
|
|
|
|
|
|
|
|
|
|
|
|
|
|
|
|
|
|
|
|
|
|
|
|
|
|
|
|
|
|
|
|
|
|
|
To use these designs, take a sheet of thin letter copying-paper, place it upon the pattern and trace the lines with a sharp
|
|
|
|
|
|
|
|
|
|
|
|
|
|
|
|
|
|
|
|
|
|
|
|
|
|
|
|
|
|
|
lead pencil. After this is done, paste this thin paper on a sheet of white paper or card and apply to the wood as heretofore described. The copying-paper needs to be pasted on white paper
to make the pencil marks more distinct.
|
|
|
|
|
|
|
|
|
|
|
|
Go to
pages:
|
0 -
40 |
41- 63 (plates) |
|